
This is the kind of meal that works just as well after a long day as it does for structured meal prep. It’s satisfying without being heavy, and the flavors actually deepen after a day in the fridge. If you’ve ever struggled to find a high-protein pasta that doesn’t feel like a compromise, this one lands right in that sweet spot between comfort and performance.
It also solves a common problem with high-protein meals: texture fatigue. Instead of dry chicken and plain carbs, you get a cohesive dish where every element works together. The sauce binds everything, the pasta carries flavor, and the chicken stays juicy. That combination makes it much easier to stick with if you’re aiming for consistent, balanced eating.
Another advantage is how predictable it is once you understand the method. There’s no guesswork around timing or texture—you can repeat it weekly and get the same result. That consistency matters when you’re cooking with specific nutrition goals in mind.
The sauce is where this dish earns its place
I’ve made versions of this that looked right but felt off—either too sharp from the peri peri or too heavy from overdoing the dairy. The fix is balance and control. Tomato paste brings depth, not just acidity. Light cream cheese melts into a smooth, slightly elastic texture that holds everything together without turning greasy.
Heat management matters more than people think. Push the pan too hard and the sauce splits; keep it gentle and you get that silky, spoon-coating finish that makes each bite feel complete. That’s the difference between something you tolerate for meal prep and something you actually look forward to eating again.
Another key detail is layering. You’re not just dumping everything in—you’re building flavor in stages. Browning the chicken creates fond in the pan, which blends into the sauce later. Cooking the tomato paste slightly removes its raw edge and concentrates its sweetness. Each small step compounds into something that tastes intentional.
Even the order of liquids matters. Adding milk before cream cheese helps regulate temperature and prevents clumping, while pasta water added gradually helps emulsify everything into a stable sauce. These small sequencing details are what separate a decent result from a consistently great one.
Once you get that right, the rest falls into place.
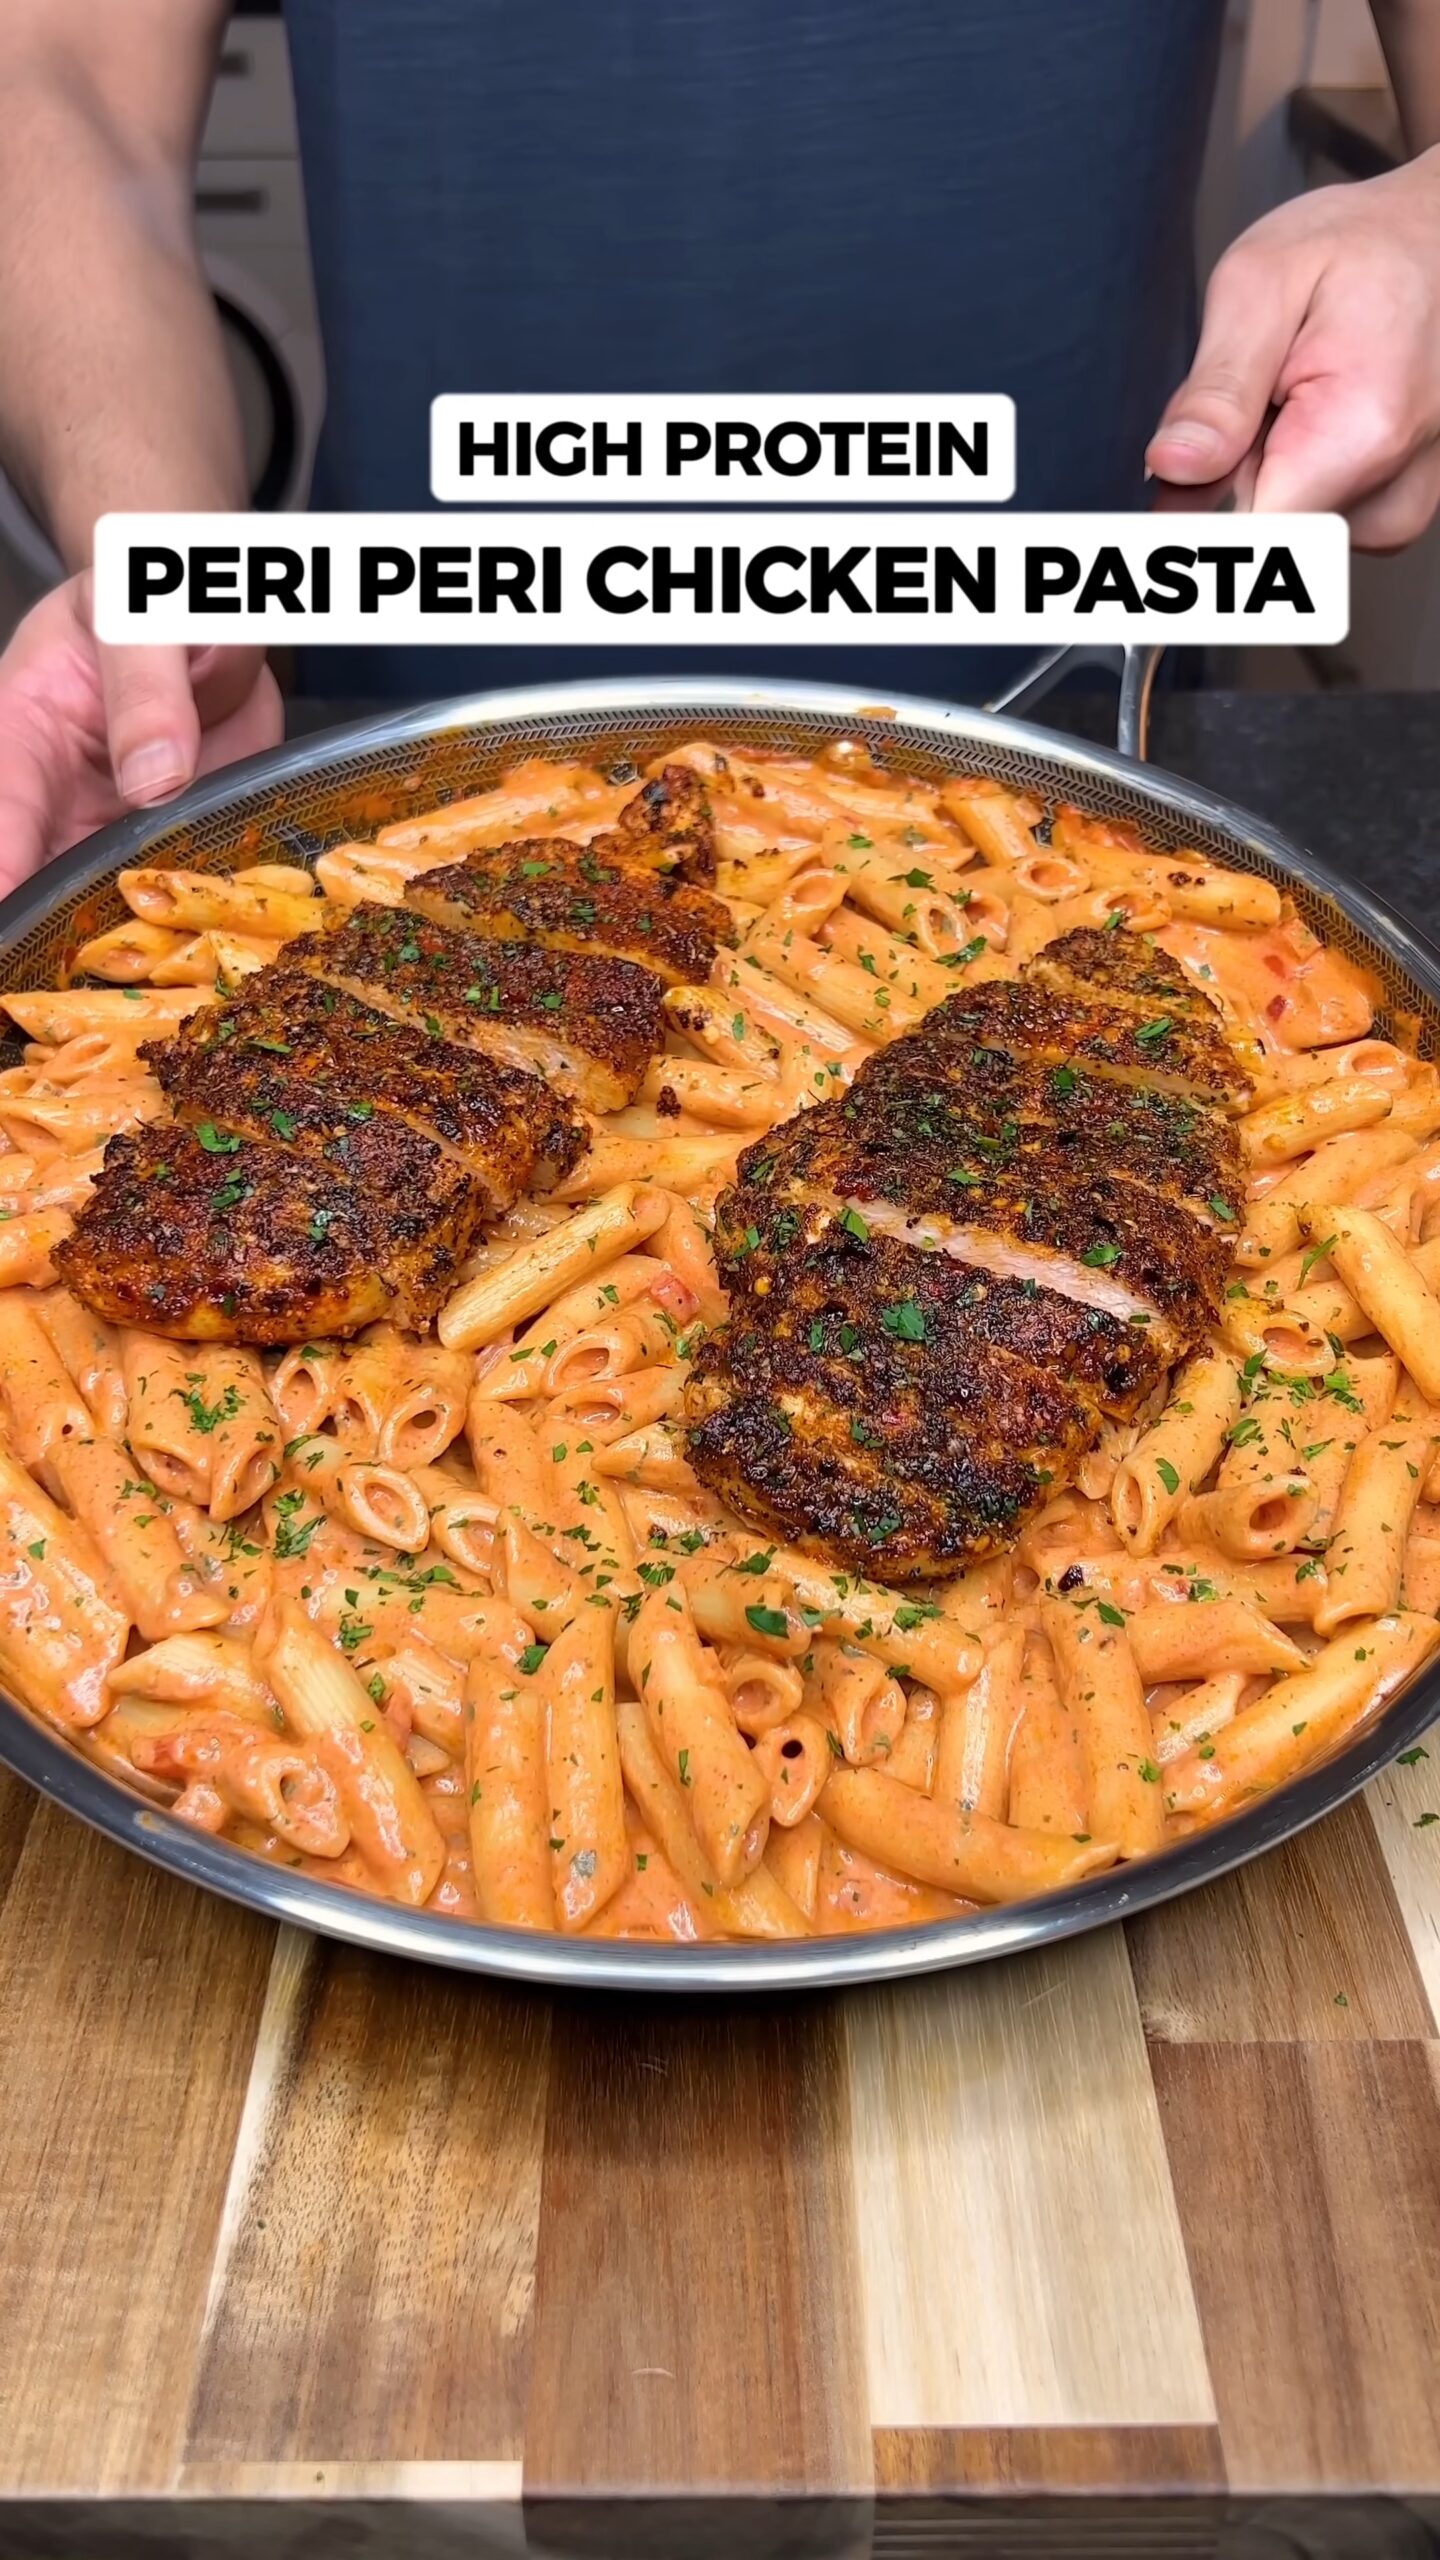
Why You’ll Love This High Protein Peri Peri Chicken Pasta
- Spicy peri peri heat softened by a creamy, balanced sauce that doesn’t feel heavy
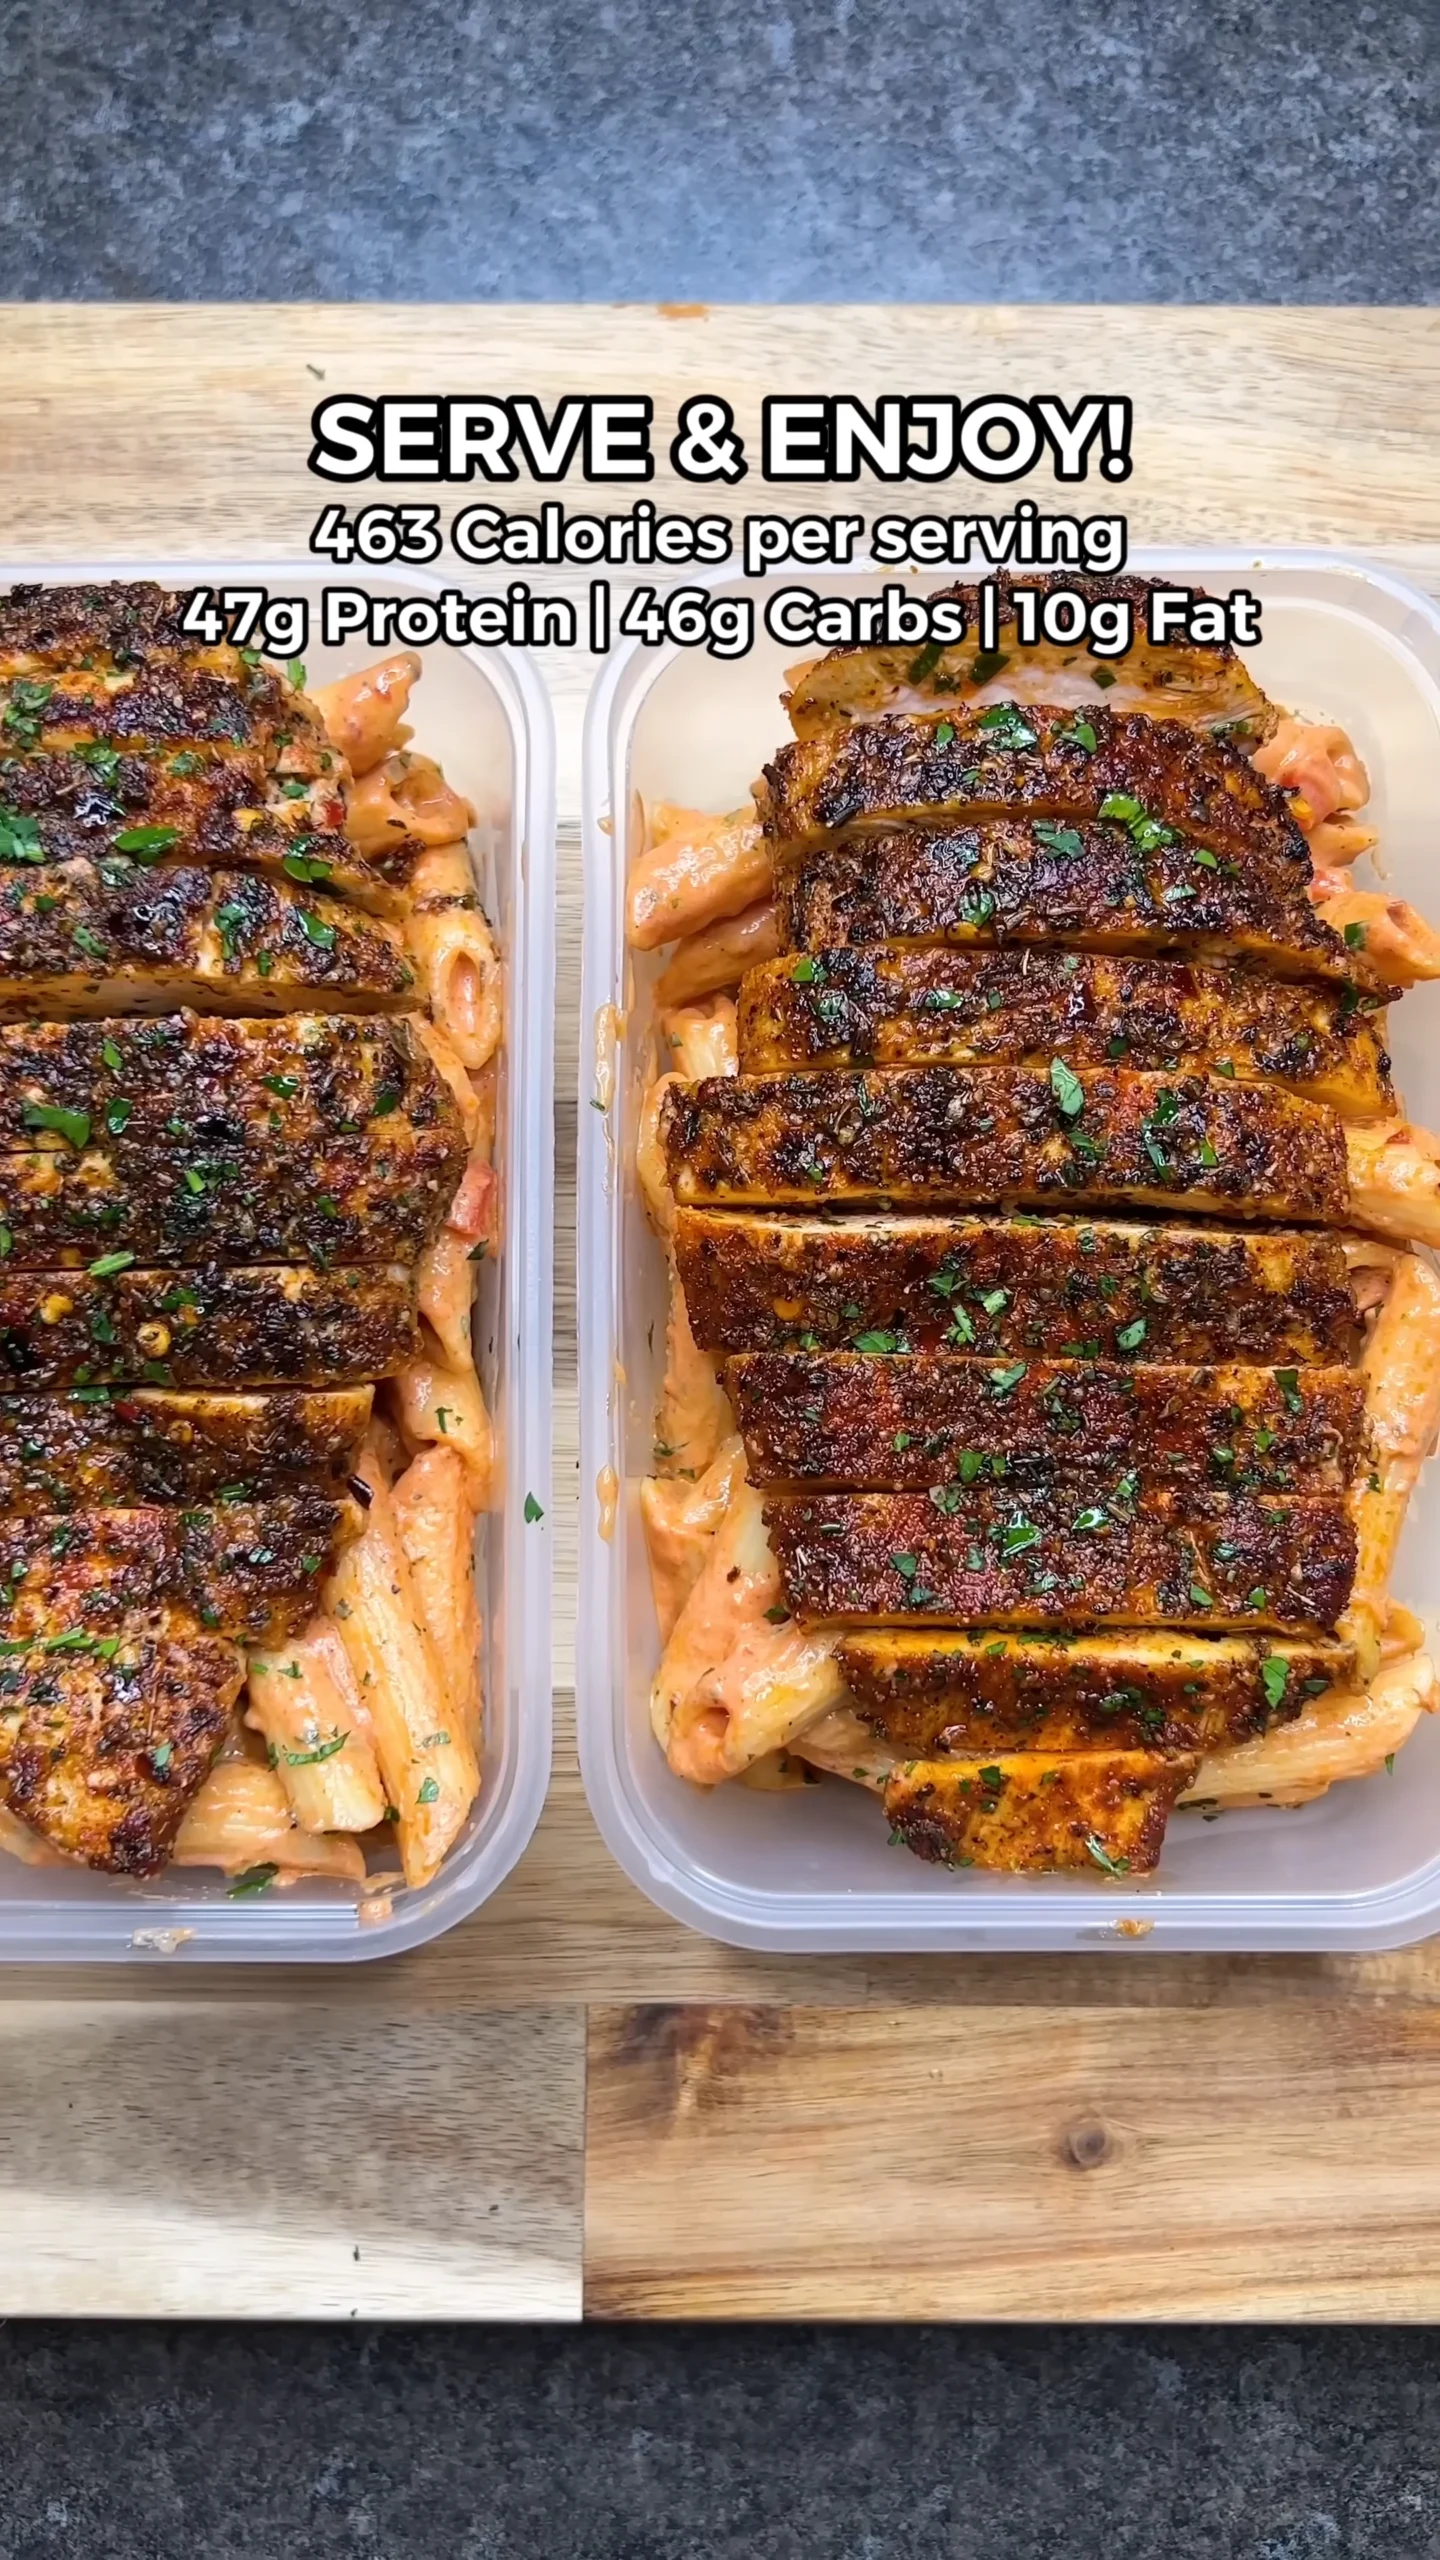
- 47g protein per serving, and it actually eats like comfort food—not a compromise
- Reheats cleanly without drying out or splitting if you follow the low-heat method
- Flexible spice level—dial it up or down without breaking the sauce
- Simple ingredients, but layered in a way that builds real depth
- Great for meal prep—flavor holds and even improves over time
- Customizable with vegetables or extra protein without affecting texture
What You’ll Need
Main Protein / Base
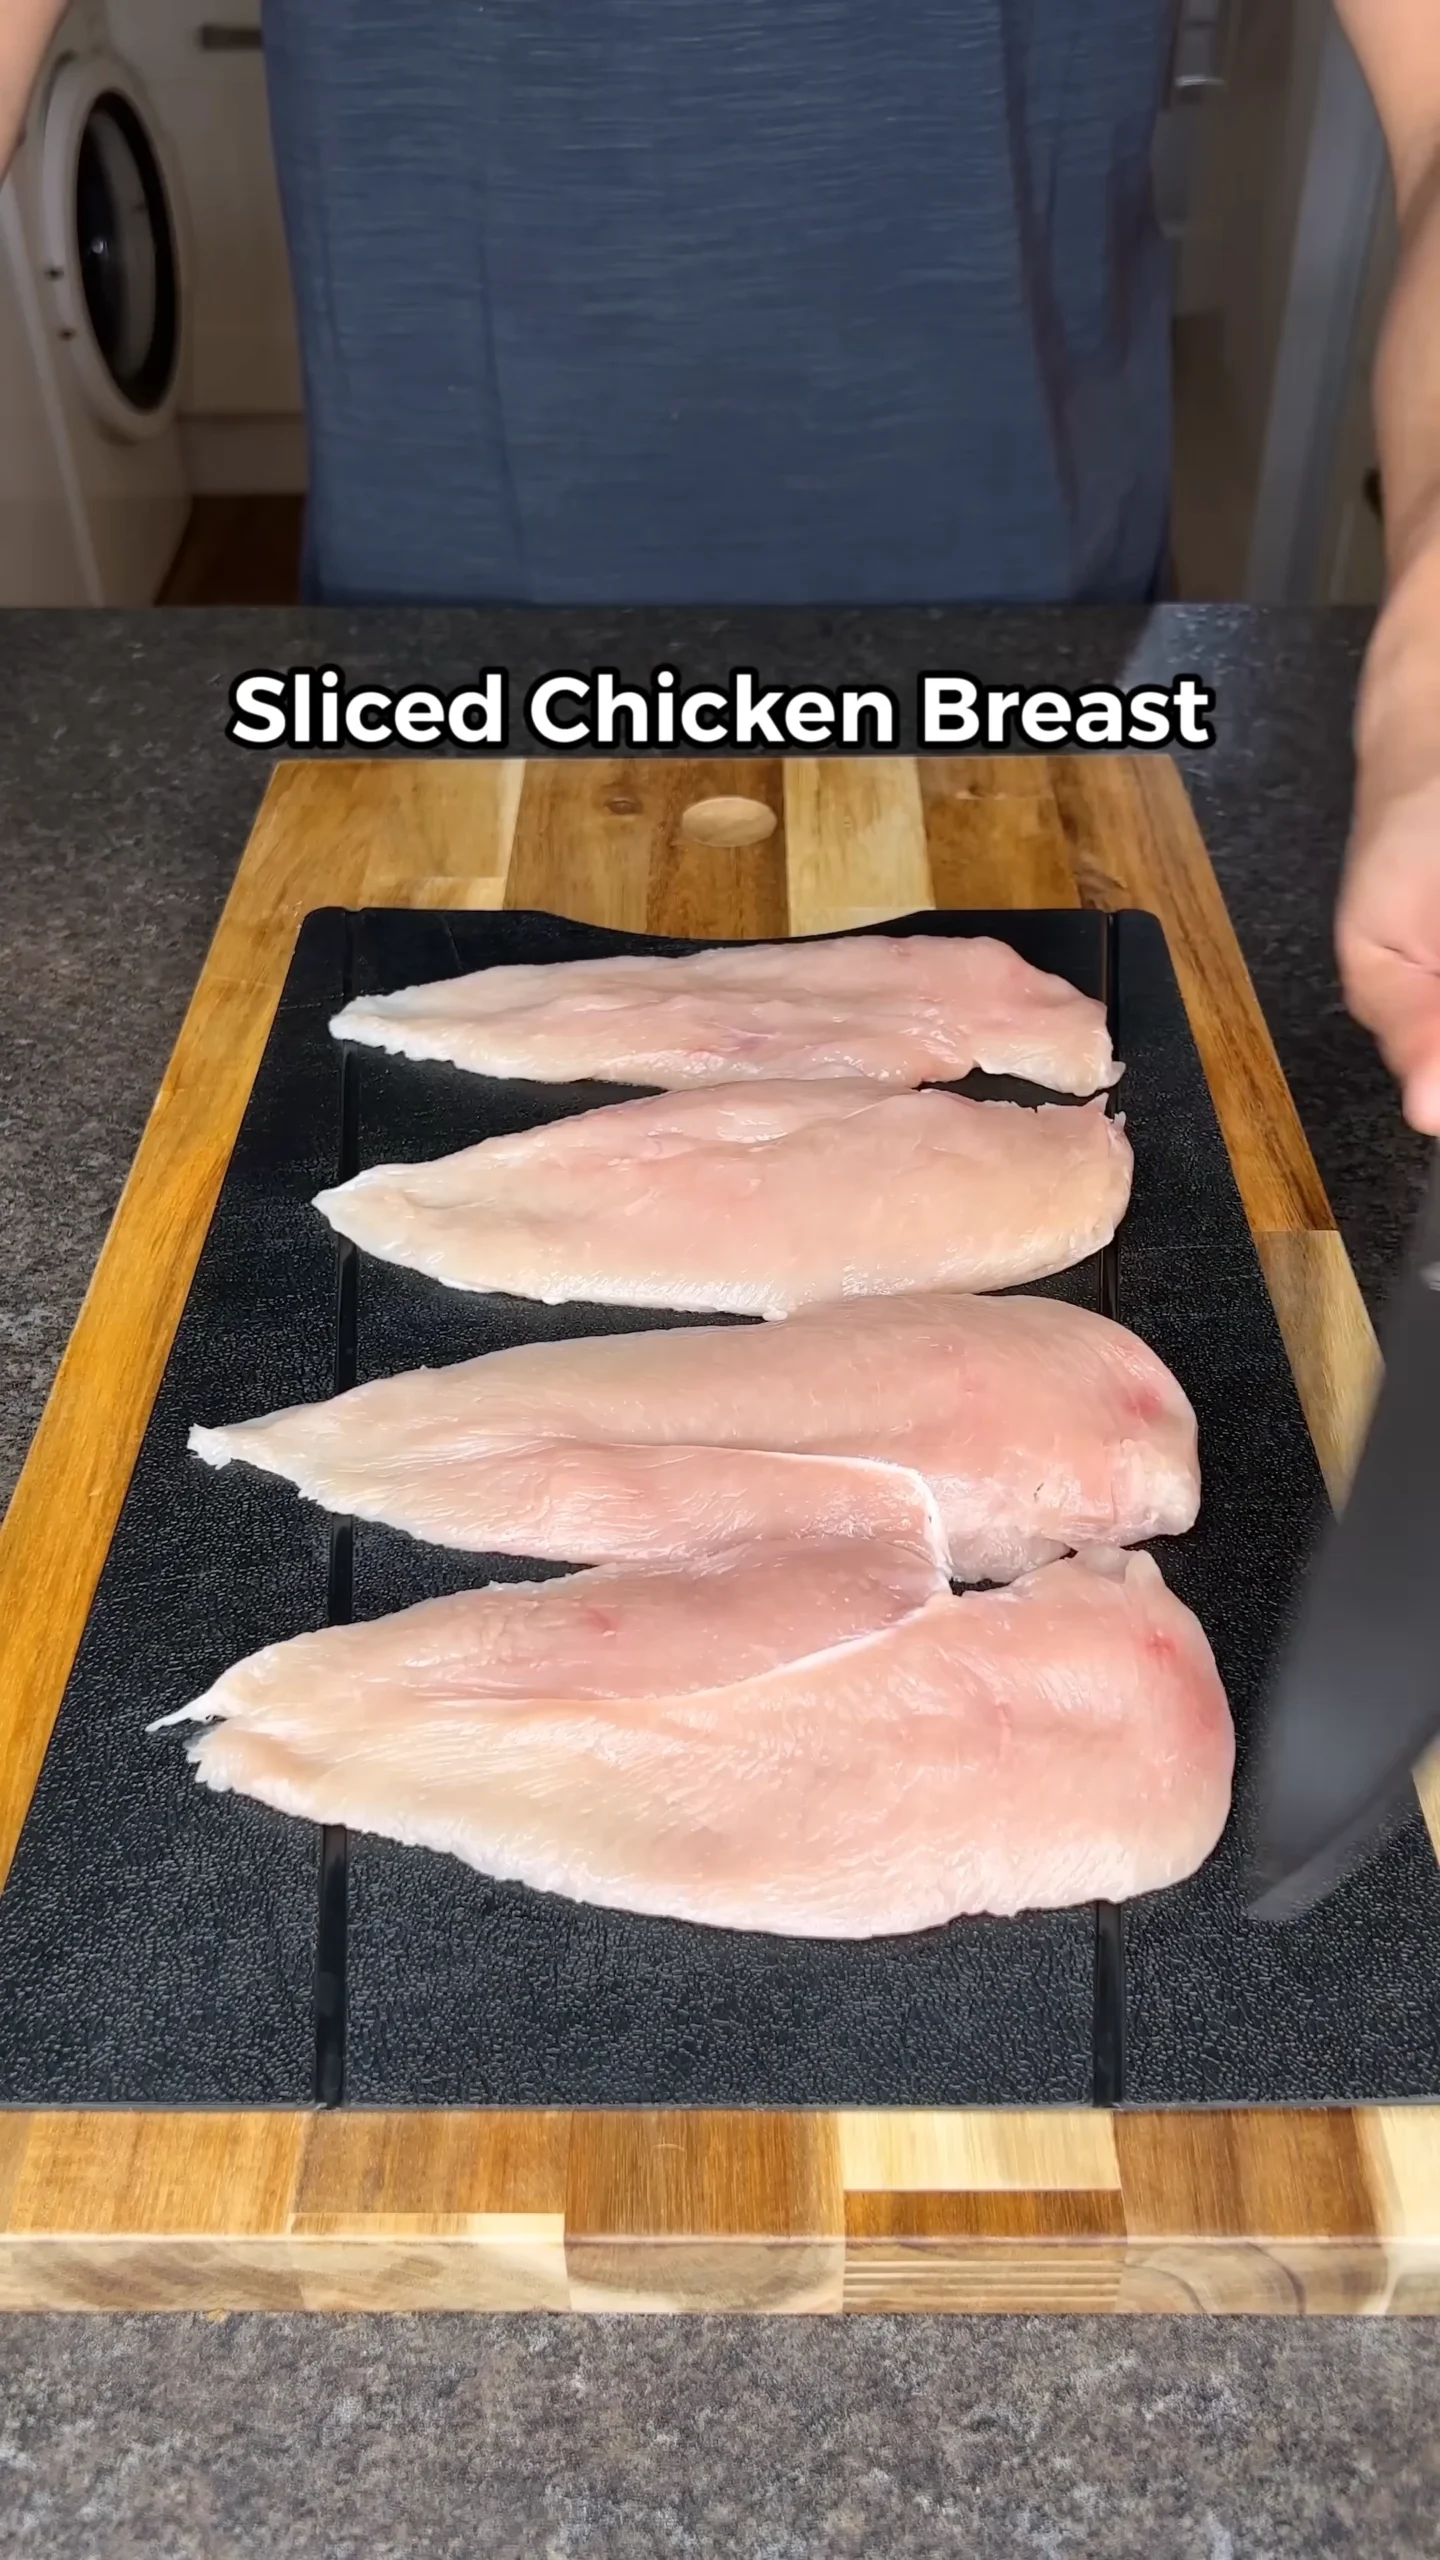
- Chicken breast – Lean and firm, it holds seasoning well and stays juicy if you don’t overcook it. Slice or cube for quicker, even cooking.
- Penne pasta – Those tubes trap the sauce inside, giving you bursts of flavor in each bite. I stick with penne here because it handles thick sauces better than spaghetti.
Aromatics
- Onion – Softens into sweetness and forms the backbone of the sauce.
- Bell pepper – Adds a slight crunch and freshness that cuts through the richness.
Spices
- Oregano – Brings a dry, earthy note that grounds the heat.
- Paprika – Adds warmth and subtle smokiness.
- Garlic powder – Even distribution without the risk of burning fresh garlic.
- Chilli flakes – A controllable heat layer—add gradually.
- Salt & pepper – Essential for pulling everything into focus.
Liquid or Sauce
- Tomato paste – Thick, concentrated richness. Cook it slightly to remove raw sharpness.
- Skimmed milk – Keeps the sauce light while still giving it body.
- Light cream cheese – This is the one I always reach for because it melts cleanly and gives that smooth, cohesive texture without excess fat.
- Pasta water – Starchy and crucial. It binds the sauce into something glossy instead of grainy.
- Peri peri sauce – Tangy, spicy, slightly acidic—this defines the dish.
Vegetables or Add-ins
- Onion and bell pepper – Not just filler—they bring contrast against the creamy base.
Toppings
- Fresh parsley – Bright, slightly bitter, and it wakes the whole dish up at the end.
Ingredient Notes and Smart Swaps
If you want to tweak this without losing what makes it work, a few adjustments go a long way. Chicken thighs can replace breast if you prefer a richer bite—they’re more forgiving and stay juicy even if slightly overcooked. For an even higher protein version, you can mix in a small amount of cooked lentils or chickpea pasta, though that will slightly change the texture.
Peri peri sauces vary a lot. Some are vinegar-forward, others are more chili-heavy. If yours is very sharp, balance it with an extra splash of milk. If it’s mild, let the chili flakes carry more of the heat.
You can also add vegetables like spinach, mushrooms, or zucchini. Just cook off their moisture before adding the sauce so you don’t dilute it. The goal is always the same: keep the sauce thick enough to cling.
If you’re using protein-enriched pasta, check cooking times carefully. These pastas can go from firm to overly soft quickly. Undercook slightly and finish in the sauce for better texture and absorption.
For extra richness without adding much fat, a small spoon of Greek yogurt stirred in off heat can enhance creaminess while boosting protein further. Just make sure the pan has cooled slightly to prevent curdling.
If you like a smokier profile, a pinch of smoked paprika or a dash of charred red pepper paste can deepen the flavor without overpowering the peri peri base.
How to Make High Protein Peri Peri Chicken Pasta
Prep & Season
- Step 1: Season the chicken – Coat both sides with oregano, paprika, garlic powder, chilli flakes, salt, and pepper. Press the seasoning in so it sticks.
- Step 2: Cut into pieces – Cube or slice into bite-sized chunks for faster cooking and better sauce coverage.
Cook the Chicken
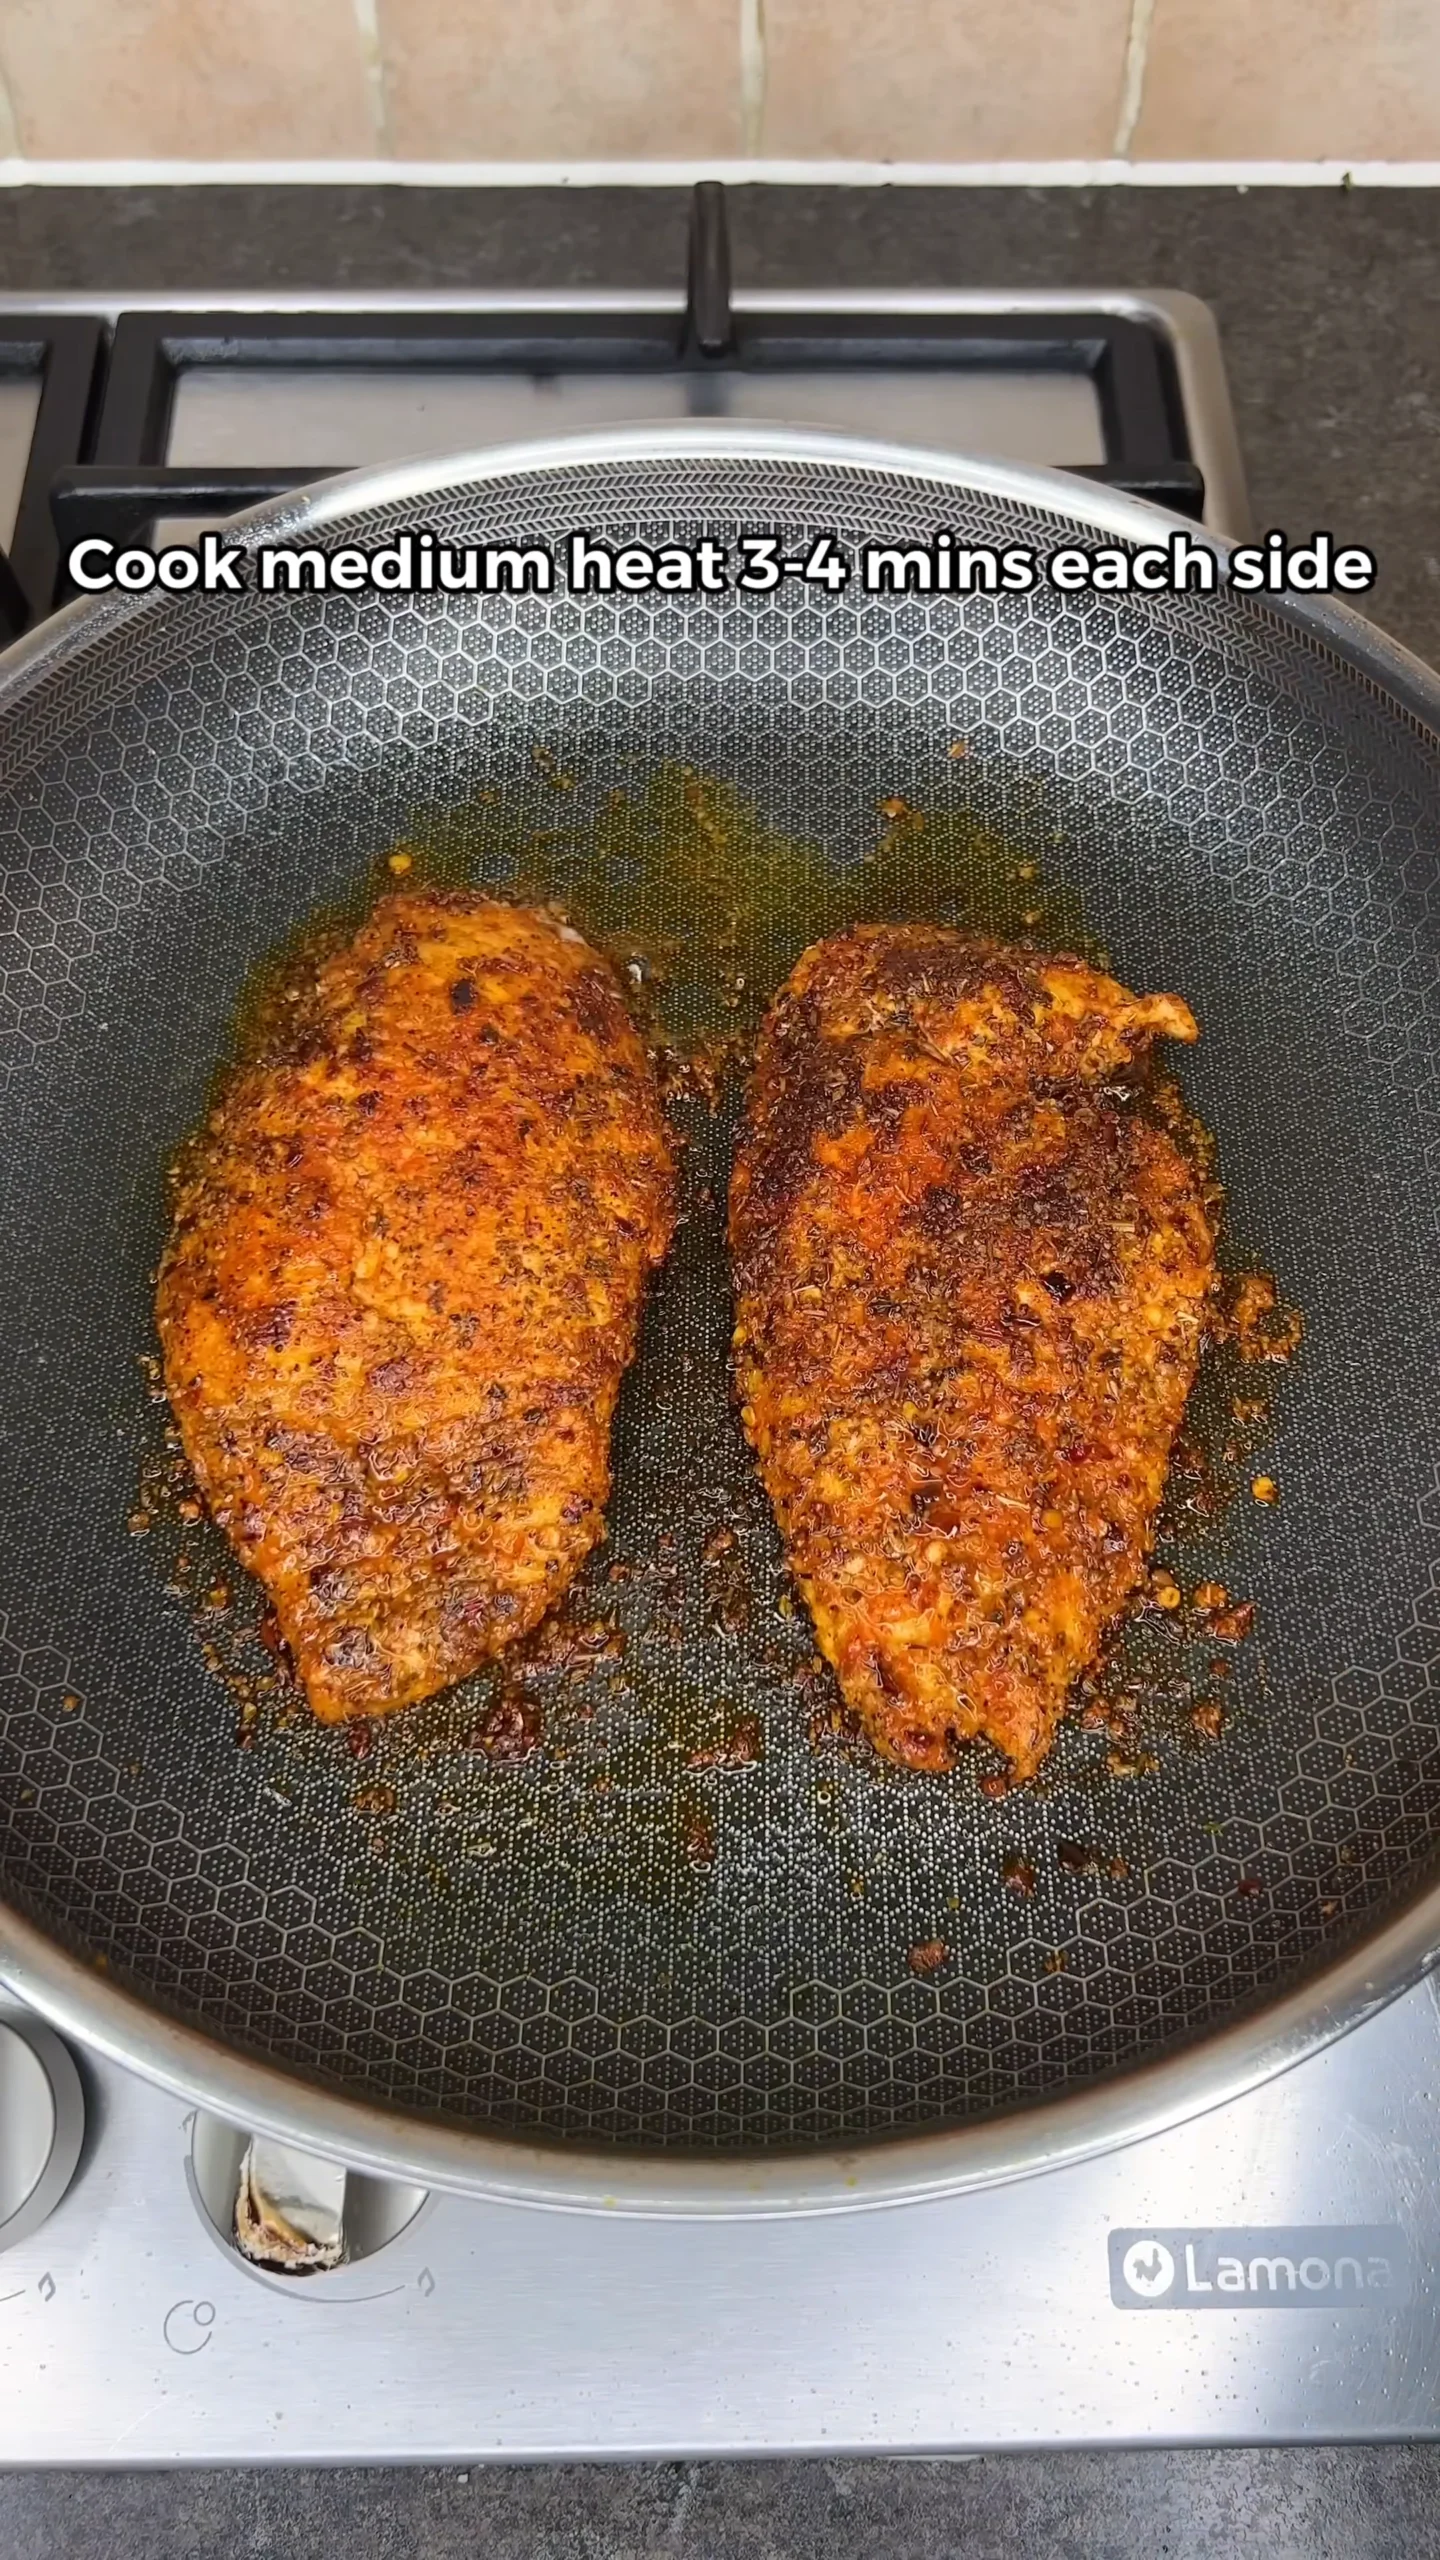
- Step 3: Sear gently – Heat 2 tsp olive oil on medium-low. Cook chicken 3–4 minutes per side until lightly golden and just cooked through. You’re looking for a soft bounce when pressed.
- Step 4: Let it rest – Remove from the pan. Don’t cut into it immediately—give it a minute to hold onto its juices.
Cook the Pasta
- Step 5: Boil in salted water – Cook penne until al dente (usually 9–11 minutes). It should have a slight bite in the center.
- Step 6: Reserve pasta water – Scoop out 100ml before draining. Don’t skip this—it’s what makes the sauce silky instead of thick and clumpy.
Build the Base
- Step 7: Cook the aromatics – In the same pan, add onion and bell pepper. Cook 5–6 minutes until softened and lightly golden at the edges. Scrape up any browned bits from the chicken as they cook.
Bring It Together
- Step 8: Lower the heat – Critical step. High heat will split the sauce.
- Step 9: Add sauce ingredients – Stir in tomato paste, milk, cream cheese, peri peri sauce, and pasta water.
- Step 10: Whisk gently – Keep it on low heat and stir until smooth and glossy. Don’t rush this—grainy sauce means the heat is too high.
- Step 11: Combine everything – Add chicken and pasta. Toss until every piece is coated.
- Step 12: Taste and adjust – Add salt, pepper, or more peri peri if needed. The sauce should feel balanced—slightly tangy, gently spicy, and creamy.
- Step 13: Finish – Sprinkle fresh parsley just before serving.
Making the Creamy Peri Peri Sauce
The sauce should move slowly when you drag a spoon through it—thick enough to coat, loose enough to flow. That texture comes from emulsifying the milk, cream cheese, and pasta water properly.
Keep the heat low from the moment dairy hits the pan. Push it too far and it separates into oil and solids. If it starts to look grainy, add a splash of milk and stir off the heat to bring it back.
Another trick is adding the cream cheese in small chunks rather than one block. It melts faster and more evenly, reducing the chance of lumps. Stir continuously but gently—aggressive mixing can actually break the structure of the sauce.
You can make the sauce ahead and refrigerate it for up to 3 days. Reheat gently with a bit of milk, stirring slowly until smooth again.
If you want a slightly looser, more restaurant-style finish, add an extra tablespoon of pasta water right at the end and toss vigorously. This creates a glossy coating that clings without feeling thick.
Common Mistakes and How to Fix Them
If your sauce turns out too thick, it usually means not enough pasta water or too much heat during reduction. Add a splash of warm milk or reserved pasta water and stir gently over low heat.
If it’s too thin, let it sit for a minute off the heat. The starch and cream cheese will naturally tighten it. Avoid cranking the heat to fix this—it will only cause separation.
Overcooked chicken is another common issue. Once it’s firm and lightly golden, it’s done. It will cook a bit more when added back to the sauce, so don’t push it too far in the pan.
If the flavor feels flat, it’s almost always a salt issue. A small pinch can bring everything into focus without needing extra sauce or spice.
If the sauce tastes too sharp, especially with stronger peri peri sauces, balance it with a small splash of milk or a pinch of sugar. This smooths out acidity without muting the heat.
Extra Tips for Best Results
Use a wide pan rather than a deep pot when combining everything. More surface area helps the sauce reduce evenly and coat the pasta instead of pooling at the bottom.
Always slice chicken against the grain if you’re cutting strips instead of cubes. This shortens the muscle fibers and keeps each bite tender rather than stringy.
Salt your pasta water properly—it should taste slightly salty, not bland. This is your only chance to season the pasta itself, which makes a noticeable difference in the final dish.
Let the finished pasta sit for 2–3 minutes before serving. This brief rest allows the sauce to tighten slightly and cling better, improving overall texture.
If you want a slightly charred flavor, let the chicken sit undisturbed for the first couple of minutes while searing. That contact builds a deeper base for the sauce.
How to Serve It
Serve it hot in a wide bowl so the sauce spreads evenly instead of pooling. Add an extra drizzle of peri peri on top if you like a sharper kick.
A sprinkle of parsley gives freshness, and a light dusting of parmesan adds a salty edge. Garlic bread works on the side, or keep it lighter with a simple salad.
For a more complete meal, pair it with roasted vegetables like broccoli or carrots. Their slight bitterness balances the creamy heat and adds texture contrast.
If you’re serving guests, finish with a squeeze of lemon just before plating. It brightens the sauce and makes the flavors feel more defined without overpowering the peri peri profile.
The texture thickens slightly as it sits, which actually makes leftovers feel more cohesive and satisfying.
Meal Prep and Portioning
This dish is built for batch cooking. Divide into individual portions while still slightly warm so the sauce settles evenly. Each portion holds its structure well and reheats without separating if handled properly.
If you’re planning multiple days ahead, slightly undercook the pasta before mixing it in. This prevents it from becoming too soft after reheating.
You can also store the sauce and pasta separately for maximum texture control, though it’s not strictly necessary. The combined version holds up surprisingly well.
Label portions with dates if you’re prepping for the week. Because the flavor intensifies over time, earlier portions may taste milder, while later ones will have a deeper, more developed profile.
Storage and Reheating
Fridge: Store in airtight containers for up to 4 days. The sauce holds well without separating.
Freezer: Freeze up to 2 months. The texture may loosen slightly after thawing but stays usable.
Reheating: Microwave or stovetop with a splash of milk or water. Stir halfway through to keep the sauce smooth.
Tip: If possible, store a little extra pasta water or milk separately—it helps bring everything back to life.
When reheating on the stove, keep the heat low and cover partially. This traps steam and helps the pasta rehydrate evenly without overcooking.
FAQ
Can I use chicken thighs instead? Yes, chicken thighs work well and stay juicier during reheating. They bring slightly more fat, which makes the sauce richer. Adjust cooking time slightly, as thighs take a bit longer to cook through evenly.
How spicy is this High Protein Peri Peri Chicken Pasta? It sits at a medium heat level. You can reduce the chilli flakes or peri peri sauce for a milder version, or increase both for more intensity without affecting the sauce texture.
Can I make it dairy-free? You can swap the milk and cream cheese for plant-based versions. The sauce will be slightly less smooth and cohesive, but still works if you keep the heat low and stir carefully.
What pasta shapes work best? Penne is ideal because it traps the sauce, but rigatoni and fusilli also hold up well. Avoid very thin pasta—it won’t carry the sauce the same way.
Can I increase the protein further? Yes, you can add extra chicken, stir in Greek yogurt, or use high-protein pasta. Just adjust liquid slightly to keep the sauce balanced.
For more on this topic, check out Chicken Parmesan Pasta Recipe, 30 Minute Chicken Parmesan Pasta Recipe and Greek Chicken Orzo Bake.
Related Recipes
- Creamy Gochujang Pasta Sauce Recipe
- Alfredo Sauce Recipe
- Spinach Artichoke Pasta
- Creamy Pesto Tortellini
- chicken parmesan pasta breakdown
- 30-minute chicken parmesan version
- Greek chicken orzo bake
High Protein Peri Peri Chicken Pasta
- Prep Time: 10
- Cook Time: 30
- Total Time: 40
- Yield: 4 servings 1x
- Category: Main Course
- Method: Stovetop, Mixing
- Cuisine: Fusion
- Diet: Low Fat
Description
This High Protein Peri Peri Chicken Pasta combines tender, seasoned chicken with a creamy, spicy sauce that clings perfectly to every bite of penne. The balance of heat, richness, and tomato depth makes it satisfying without feeling heavy. It is ideal for meal prep and reheats beautifully while maintaining its texture. If you enjoy bold pasta dishes, you may also like this Creamy Gochujang Pasta Sauce Recipe for another spicy twist.
Ingredients
- 700 g chicken breast (boneless, skinless, sliced or cubed)
- 1 tbsp oregano (dried)
- 1 tbsp paprika (smoked or sweet)
- 1 tbsp garlic powder (fine)
- 1 tsp chilli flakes (adjust to heat preference)
- 1 tsp salt (fine)
- 1/2 tsp black pepper (freshly ground)
- 2 tsp olive oil (extra virgin)
- 225 g penne pasta (uncooked)
- 1 medium onion (finely chopped)
- 1 bell pepper (sliced, any color)
- 100 g tomato paste (concentrated)
- 200 ml skimmed milk (warm)
- 100 g light cream cheese (softened, low-fat)
- 100 ml pasta water (reserved from cooking)
- 60 g peri peri sauce (adjust to taste, medium heat)
- 1 tbsp fresh parsley (chopped, for garnish)
- Extra salt, pepper, oregano, and chilli flakes (to taste)
Instructions
- Boil Pasta (212°F, 10 minutes): Bring a large pot of salted water to a rolling boil at 212°F. Cook penne for 9–11 minutes until al dente; pasta should be tender with a slight bite. Reserve 100 ml pasta water before draining.
- Season Chicken (Room Temp, 5 minutes): Toss chicken with oregano, paprika, garlic powder, chilli flakes, salt, and pepper until evenly coated; surface should look fully seasoned and slightly dry.
- Sear Chicken (375°F, 6–8 minutes): Heat olive oil in a pan over medium heat (about 375°F). Cook chicken 3–4 minutes per side until golden brown with a firm, cooked-through center (internal temp 165°F).
- Rest Chicken (Off Heat, 3 minutes): Remove chicken and let it rest; juices should settle and meat remains moist when sliced.
- Sauté Vegetables (350°F, 5 minutes): In the same pan, add onion and bell pepper. Cook over medium heat until softened and slightly translucent with light browning.
- Cook Tomato Paste (350°F, 2 minutes): Stir in tomato paste and cook until it darkens slightly and smells sweeter, indicating reduced acidity.
- Build Sauce Base (Low Heat 250°F, 3 minutes): Lower heat and pour in warm milk, stirring gently; mixture should become smooth without curdling.
- Add Cream Cheese (Low Heat 250°F, 3 minutes): Whisk in cream cheese until fully melted and the sauce turns silky and thick with no lumps.
- Emulsify Sauce (Low Heat 250°F, 2 minutes): Gradually add reserved pasta water while whisking until the sauce becomes glossy and coats the back of a spoon.
- Add Peri Peri & Chicken (Low Heat 250°F, 2 minutes): Stir in peri peri sauce and return chicken to the pan; sauce should be creamy with a slight red-orange hue.
- Combine Pasta (Low Heat 250°F, 2 minutes): Add cooked pasta and toss thoroughly until evenly coated; pasta should appear glossy and well-bound with sauce.
- Finish & Serve (Off Heat, 1 minute): Adjust seasoning, sprinkle parsley, and serve immediately; final dish should be creamy, cohesive, and lightly spicy.
Notes
- Substitutions: Swap chicken breast for chicken thigh for juicier meat, or use tofu for a vegetarian version.
- Make-ahead: Cook fully and store in airtight containers for up to 4 days in the refrigerator.
- Storage: Keep refrigerated at or below 40°F for up to 4 days; freeze for up to 2 months in sealed containers.
- Reheating: Microwave at 50% power for 2–3 minutes with a splash of water or milk, stirring halfway, until creamy again.
- Serving suggestion: Pair with a simple green salad or roasted vegetables to balance the richness.
- Spice control: Adjust peri peri sauce and chilli flakes to control heat level without affecting texture.
Nutrition
- Array