If you’ve ever been disappointed by soggy tacos or bland fillings, this method fixes both. The focus here is not just flavor, but control—heat, moisture, and layering all working together so every bite stays crisp, rich, and balanced. Once you understand that, these tacos become something you can repeat effortlessly.
They also solve a common problem with high-protein meals: dryness. Instead of relying on sauces to carry the dish, this recipe builds flavor directly into the chicken and uses fat strategically so the result stays juicy inside while crisp outside. It’s a small shift in approach that makes a big difference in how satisfying the final tacos feel.
Where the crunch actually comes from (and why most tacos miss it)
I’ve ruined enough trays of tacos to know the problem isn’t the filling—it’s moisture control. Steam is the enemy of crispness. If your tortillas go soft, it’s usually because the order is wrong or the heat is too gentle.
Here’s what changed everything for me: cook the chicken hot enough to create browned edges, then use those pan juices intentionally. Brushing the tortillas lightly with that fat gives you flavor and helps them fry in the oven. Cheese goes down first so it melts into the tortilla and forms a thin, crisp layer. Chicken sits on top, and anything fresh stays last.
Another key detail is spacing. If tacos are packed too tightly on a tray, heat can’t circulate and steam builds up. Give them a little room so the edges can crisp properly. A preheated tray or rack also helps kickstart that sizzle the moment they go in.
Once you see the edges blister and hear that faint sizzle in the oven, you’ll know you’ve got it right. Let’s cook.
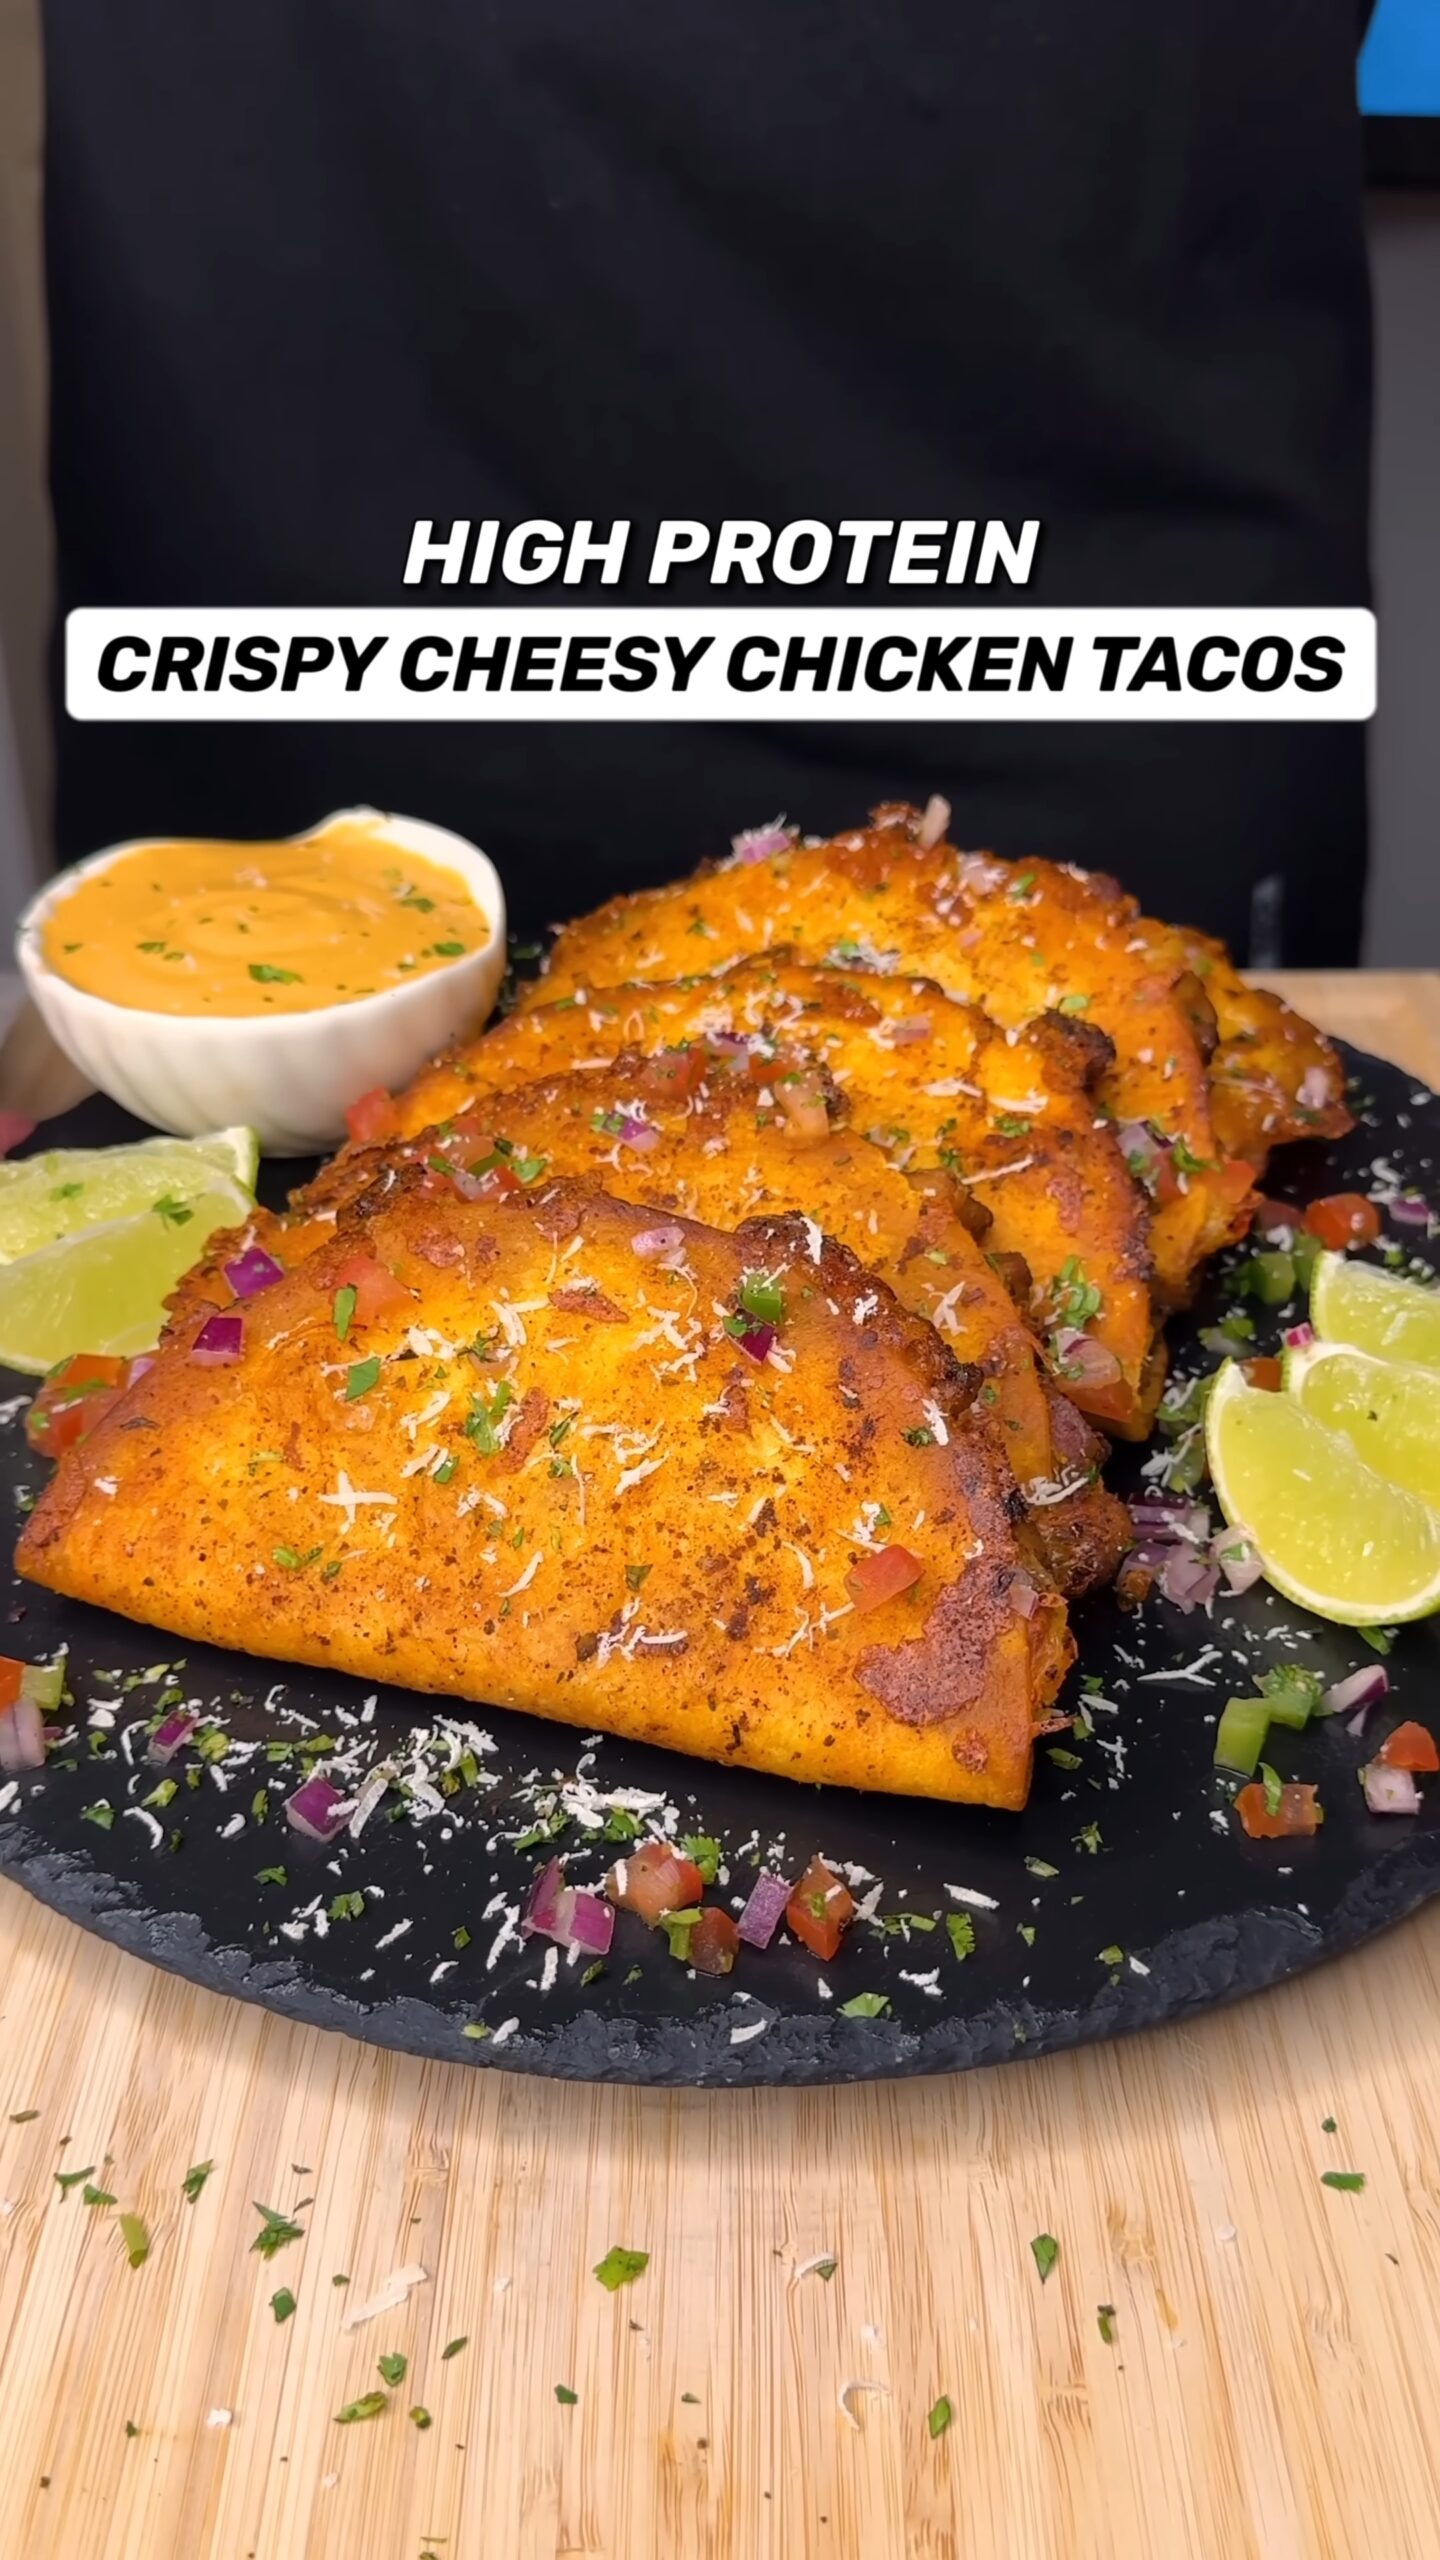
Why You’ll Love This High Protein Crispy Cheesy Chicken Tacos
- Deep smoky seasoning with a clean lime finish that cuts through the richness
- Crispy on the outside, juicy inside—no oil bath, just smart layering and heat
- High protein from chicken thighs, filling without that heavy, sluggish feeling
- Weeknight-friendly: you’re eating in about 30 minutes, including prep
- Flexible—swap salsa styles, adjust spice, or change cheese without breaking the method
- Great for meal prep—cook once, crisp fresh portions as needed
What You’ll Need
Main Protein / Base
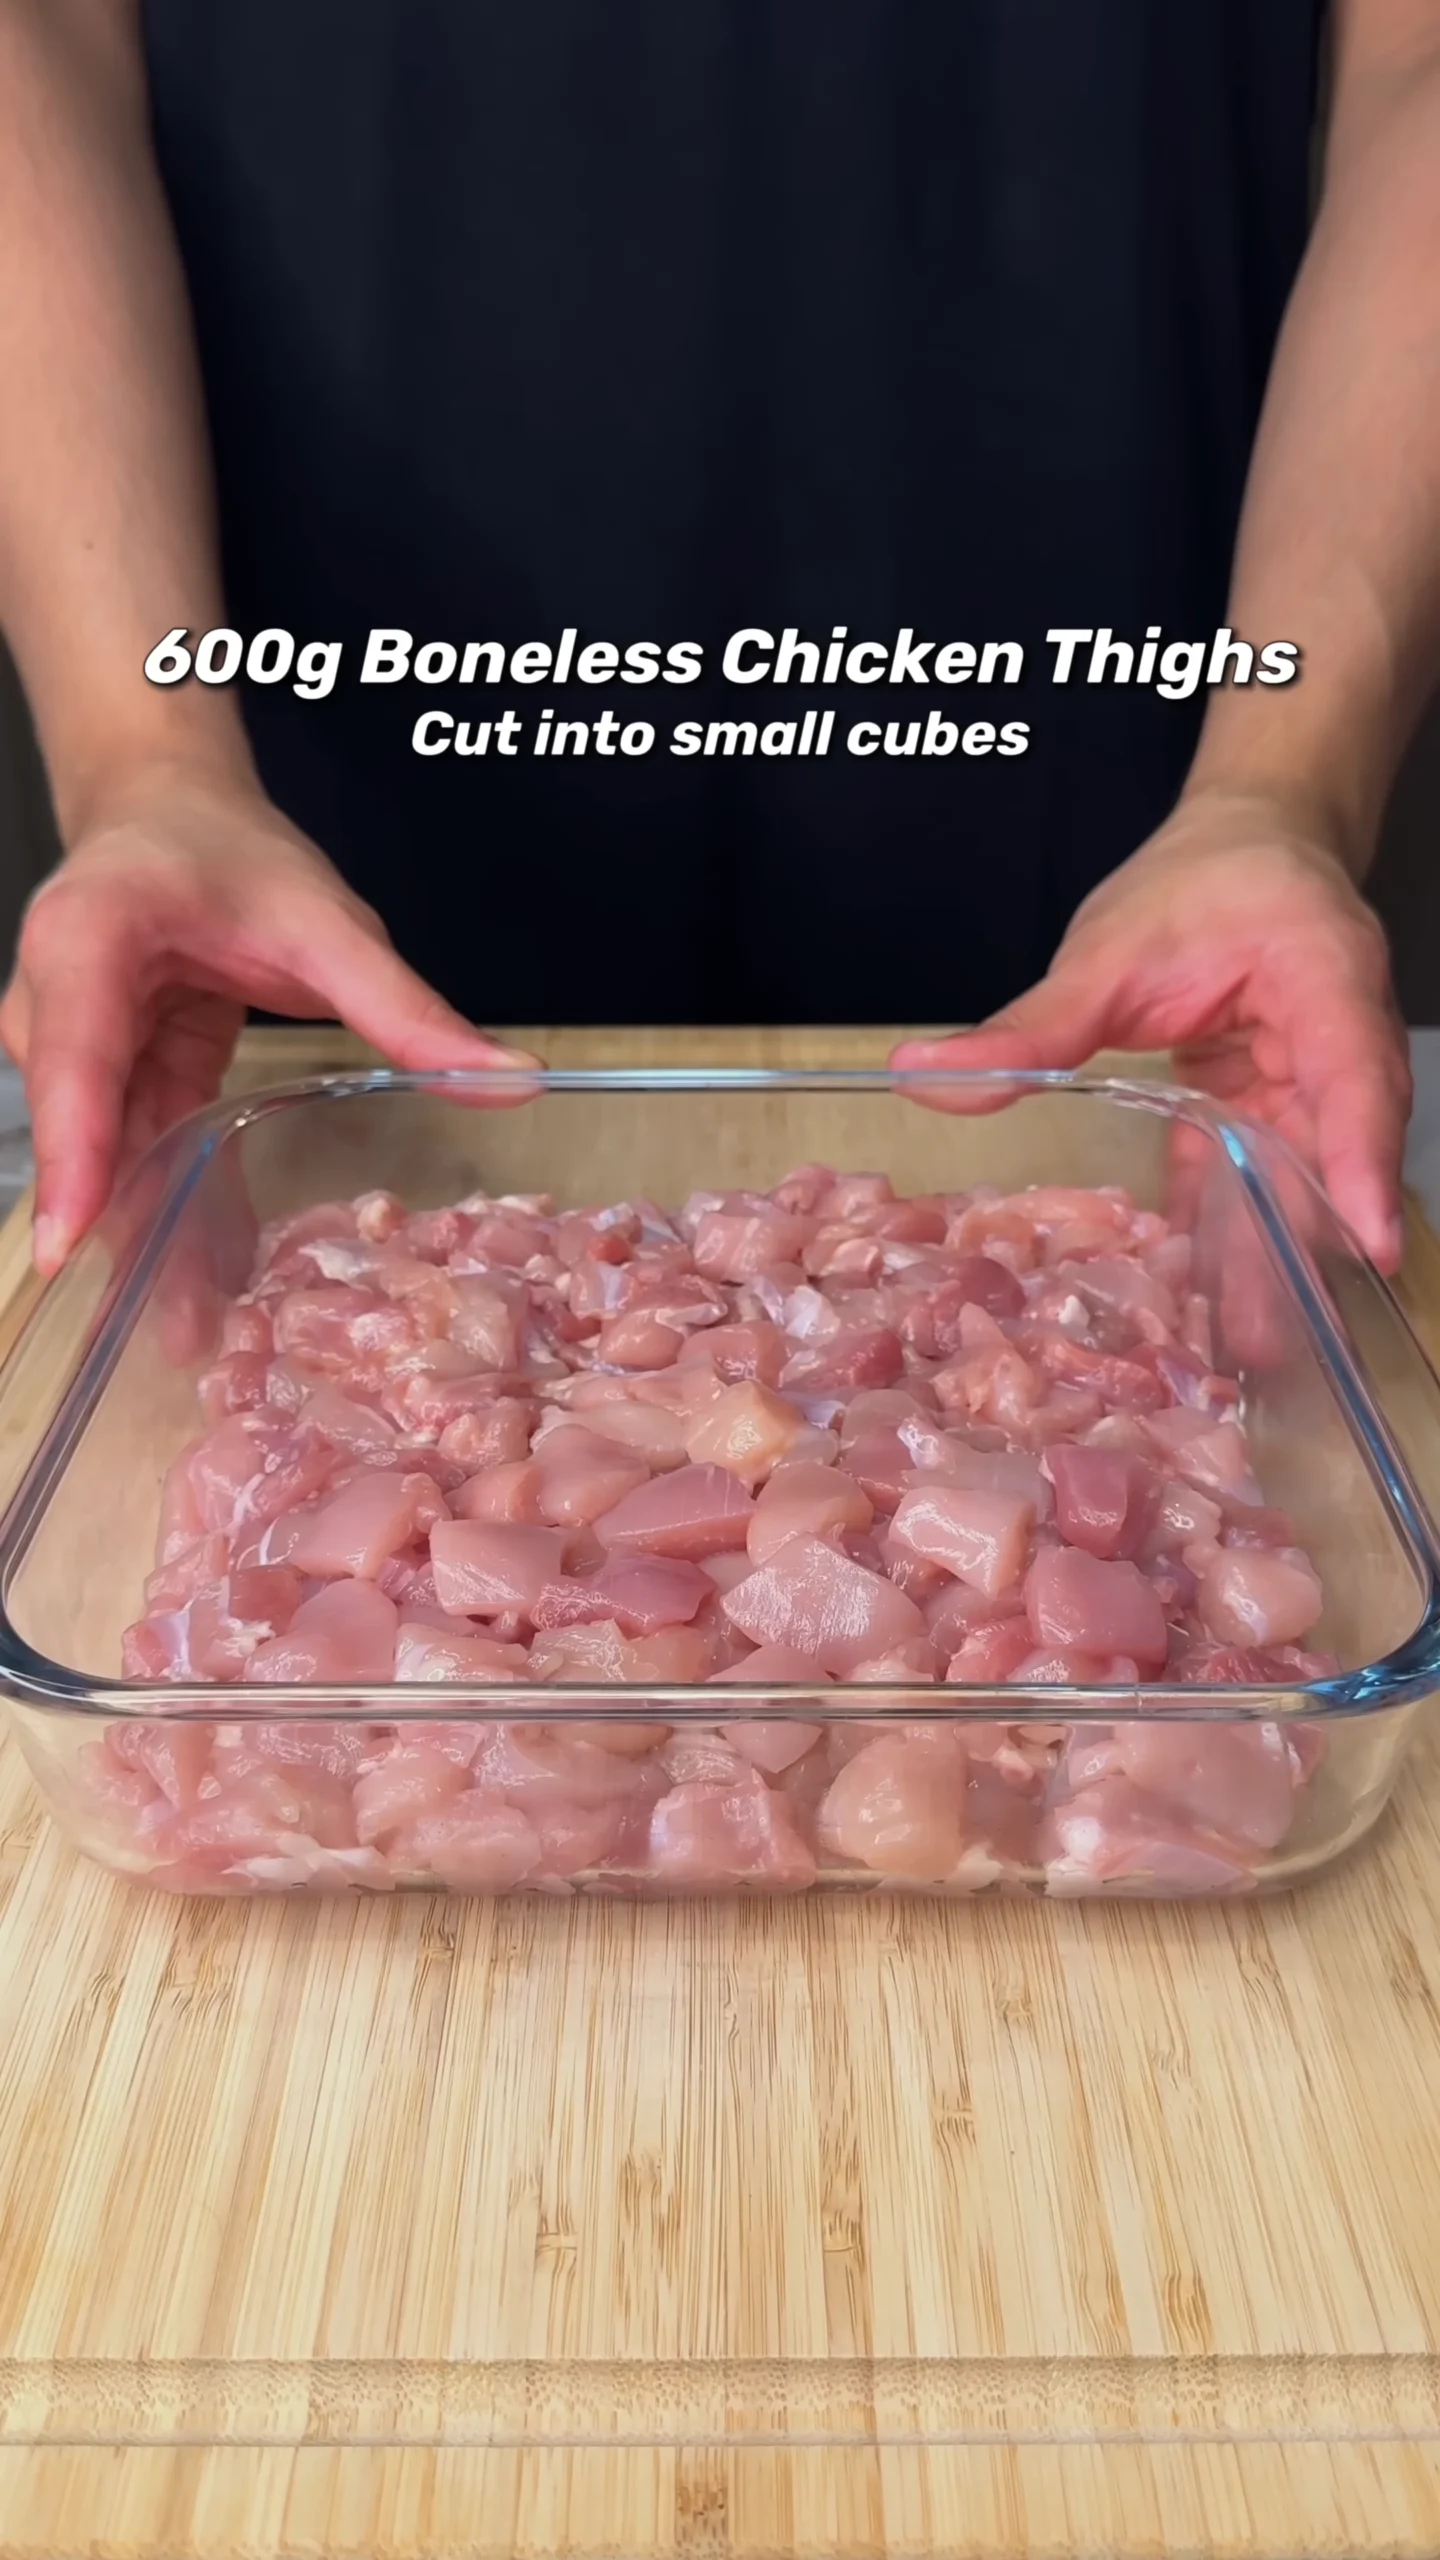
- Boneless skinless chicken thighs (600g): Thighs stay tender under high heat and give you those caramelized edges without drying out. Breast works, but it needs more attention.
- Mini street tacos (6): Smaller tortillas crisp more evenly and hold their shape. Large ones tend to fold and steam.
Aromatics
- Garlic powder & onion powder: Dry aromatics coat the chicken evenly without adding moisture that would fight browning.
Spices
- Smoked paprika: Adds color and a subtle smokiness that reads like grilled food.
- Oregano & parsley: Lift the heavier spices and keep the mix from tasting flat.
- Cumin: Earthy warmth that rounds everything out.
- Salt: This is where most people under-season. 1.5 tsp for 600g is the difference between bland and balanced.
Liquid or Sauce
- Olive oil: Helps the spice mix cling and promotes browning.
- Cooking spray or light butter: Encourages a fast sear and prevents sticking. Butter adds a slightly deeper aroma.
Vegetables or Add-ins
- Fresh salsa: Red onion, tomato, coriander, lime, black pepper. You want brightness and a bit of acidity to cut the fat. If you want a sharper version, this fresh corn tomato salsa approach brings sweetness and crunch.
Toppings
- Shredded mozzarella (90g): Melts evenly and crisps beautifully. This is the one I always reach for because it gives you that lace-like golden edge.
- Chopped coriander: Fresh, slightly citrusy finish.
- Grated Parmesan: Optional, but it adds salty, nutty crisp spots.
- Lime juice: Final squeeze sharpens everything. Skip it and the tacos feel heavier.
Ingredient Notes and Smart Swaps
If you don’t have every ingredient on hand, you can still make excellent tacos by understanding what each component does.
Chicken thighs can be swapped with breast, but also with finely chopped chicken tenderloins or even ground chicken. If using ground chicken, cook it until slightly crispy in spots and let excess moisture cook off before assembling.
Mozzarella is chosen for melt and stretch, but a mix of mozzarella and cheddar adds sharper flavor. Monterey Jack is another strong option for smooth melting. Avoid pre-shredded cheese if possible—it contains anti-caking agents that reduce melt quality.
Corn tortillas tend to crisp faster and give a more traditional texture, while flour tortillas become slightly more flaky and rich. Both work—just adjust bake time slightly depending on thickness.
If you want more vegetables without losing texture, finely shredded cabbage or lettuce can be added after baking. Avoid adding watery vegetables before crisping, as they release steam.
For extra protein, you can add a thin layer of refried beans or black beans under the chicken, but keep it very light. Too much will soften the tortilla and overpower the crisp texture you’re aiming for.
How to Make High Protein Crispy Cheesy Chicken Tacos

Prep & Season
- Step 1: Cube and season — Cut the chicken into small, even cubes (about 1.5–2 cm). Toss with salt, garlic powder, onion powder, smoked paprika, parsley, oregano, cumin, and olive oil until every piece is coated and slightly glossy.
- Step 2: Preheat the pan — Set a wide pan over medium-high heat. Add a light spray of oil or a small knob of butter. You want it hot enough that the chicken sizzles immediately on contact.
Cook Until Golden and Juicy
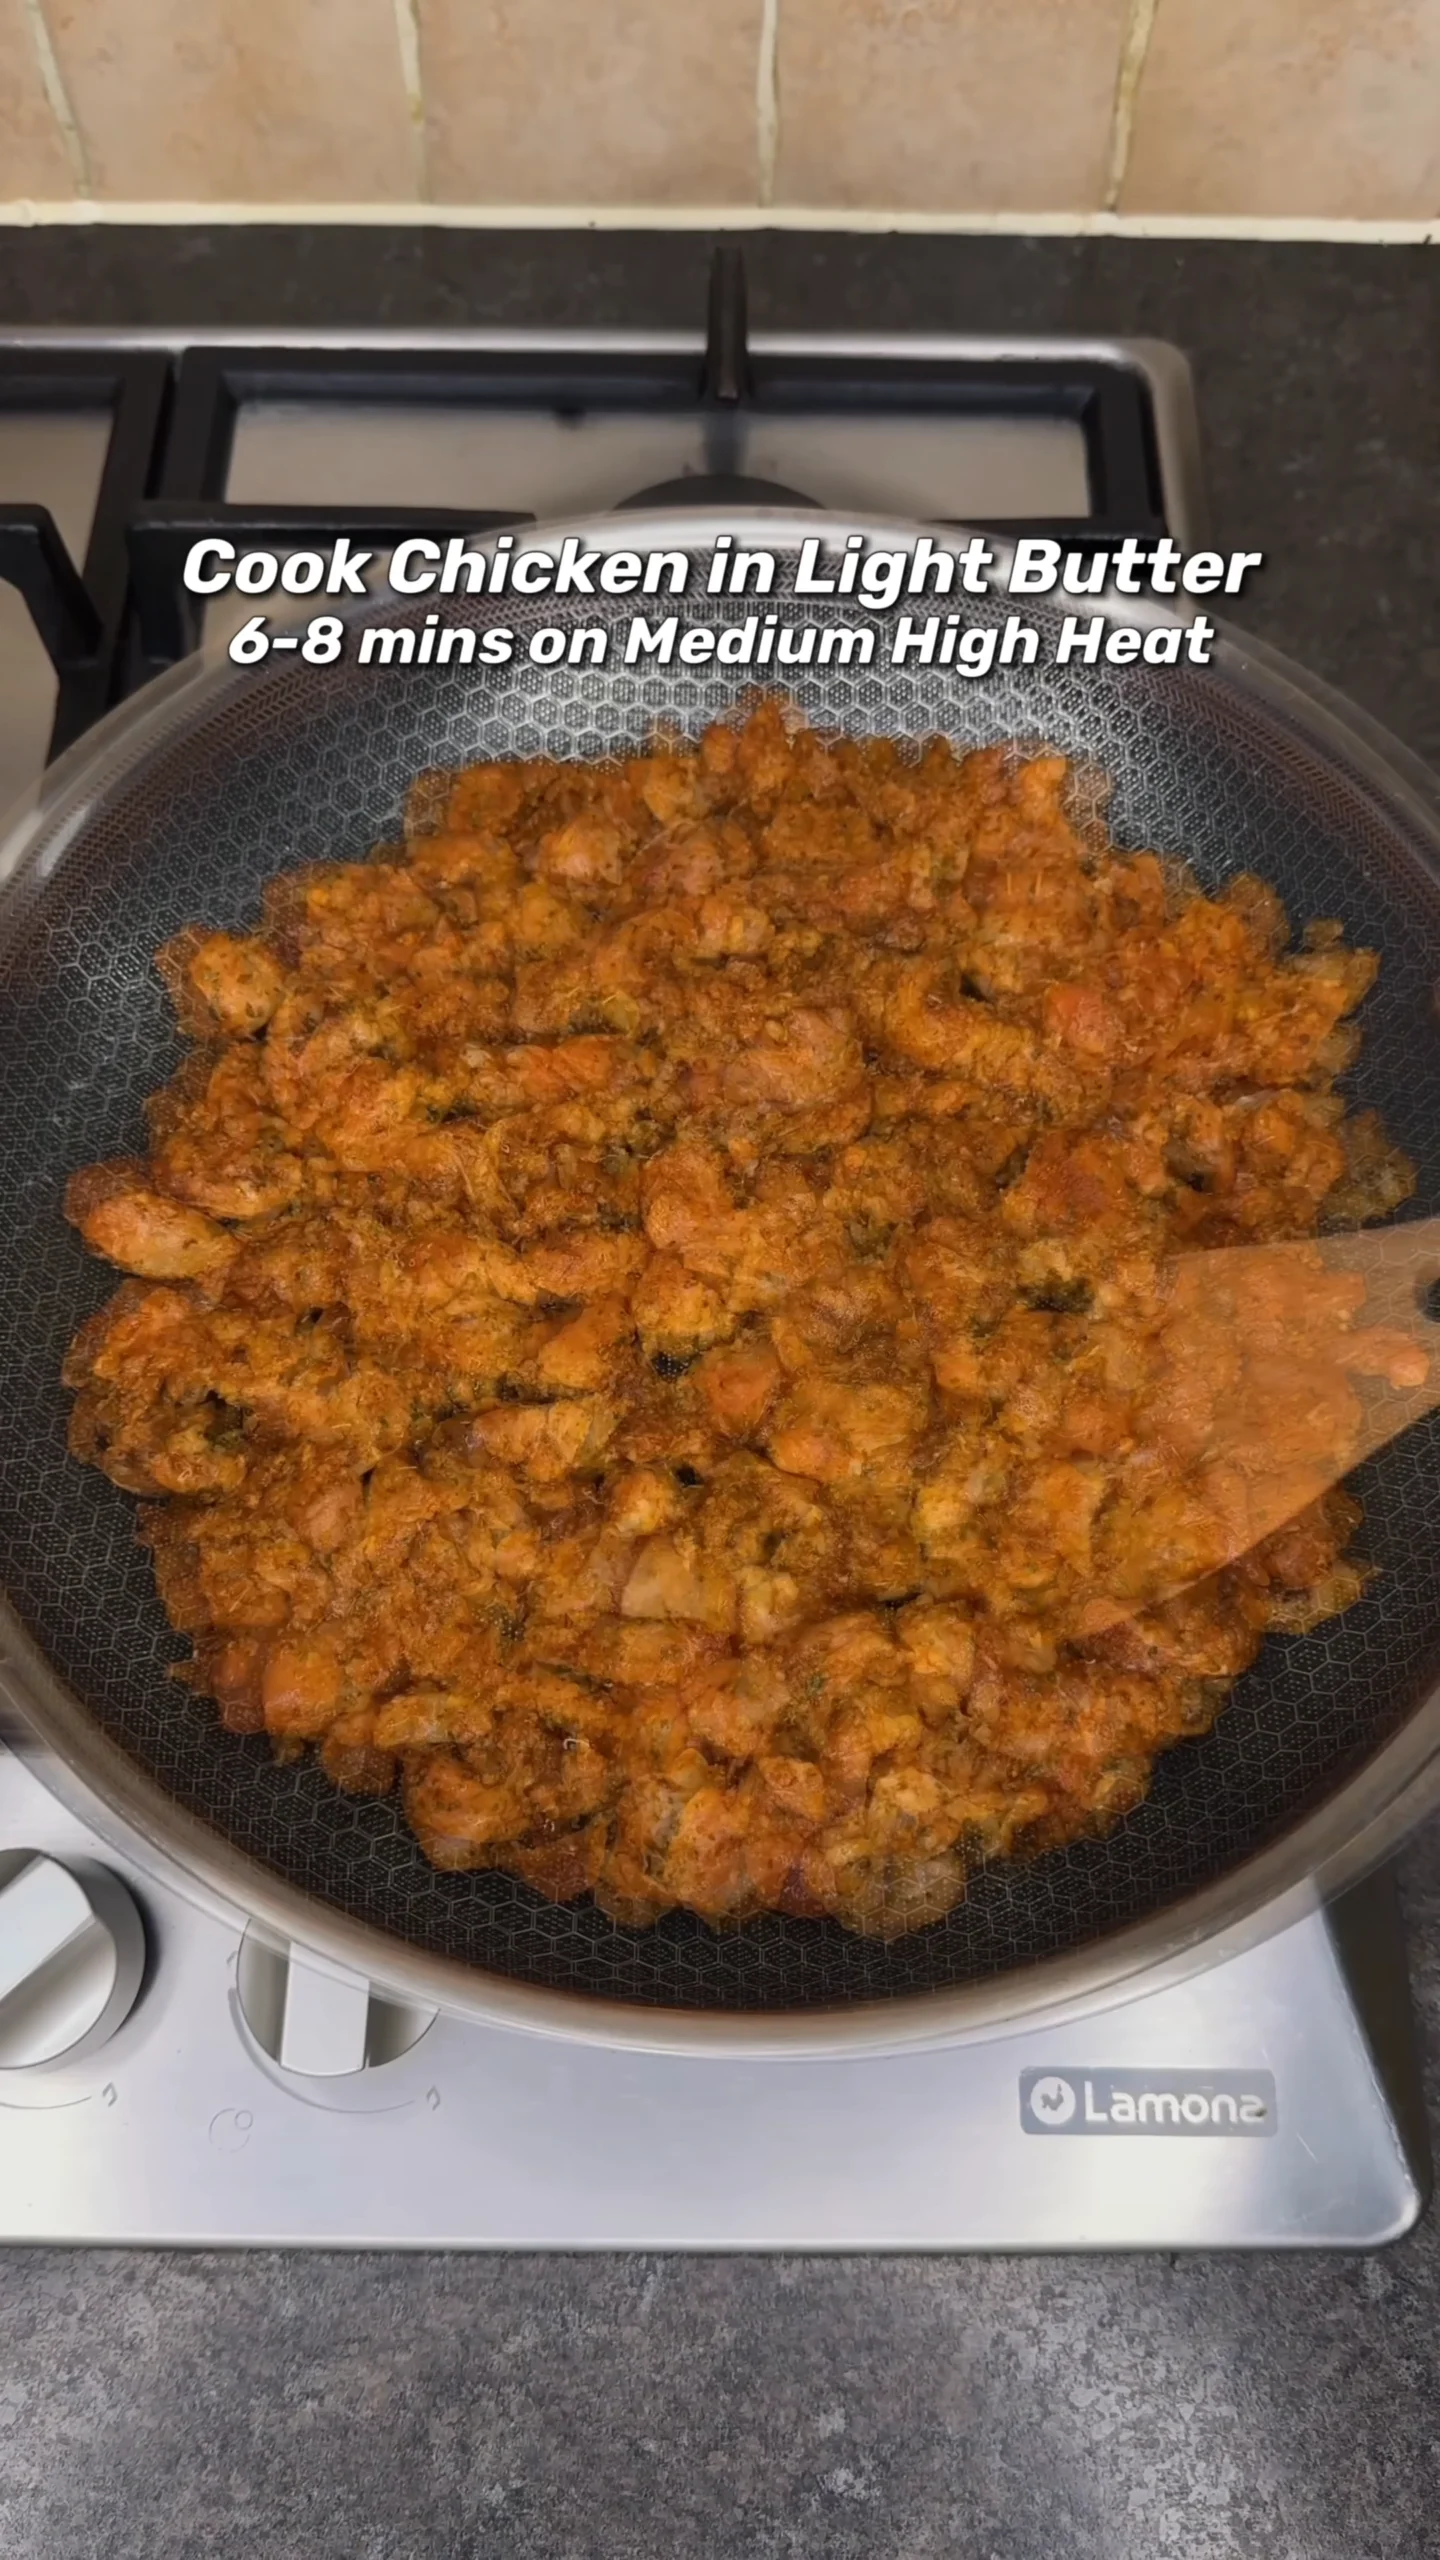
- Step 3: Sear the chicken — Add the chicken in a single layer. Leave it alone for 2 minutes to build color, then stir occasionally for a total of 6–8 minutes until browned with crisp edges. Don’t overcrowd the pan or it will steam instead of sear.
- Step 4: Capture the flavor — Turn off the heat and keep the pan juices. That rendered fat carries spice and salt—this is what will flavor and crisp your tortillas.
Build the Tacos
- Step 5: Brush the tortillas — Lightly rub one side of each tortilla in the warm chicken juices. Not soaked—just a thin film.
- Step 6: Layer in the right order — Cheese first (about 15g), then hot chicken, then a spoon of fresh salsa. This order matters. Cheese against the tortilla creates a barrier and crisps; salsa last keeps things from going soggy.
Crisp to Finish
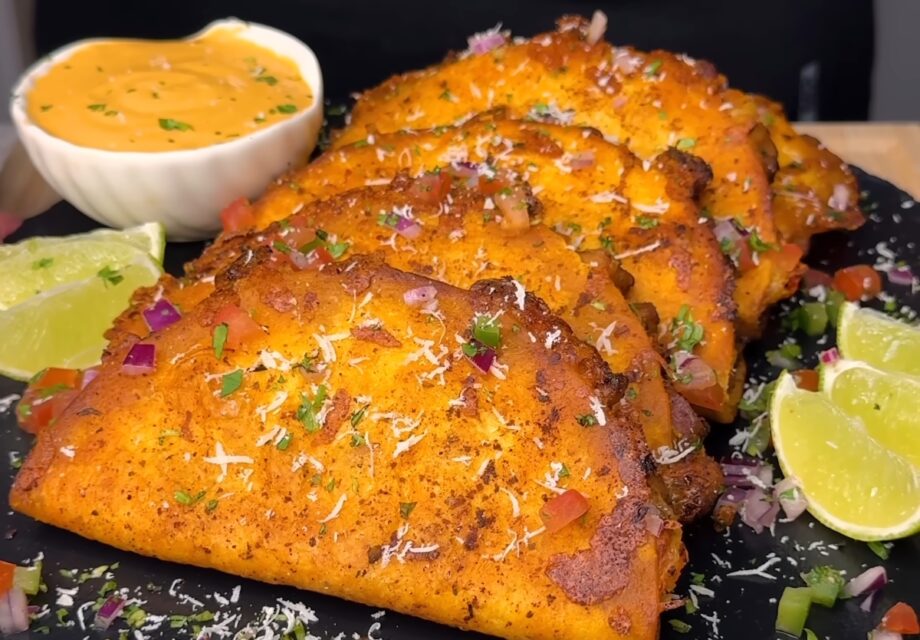
- Step 7: Bake or air fry — Cook at 200°C / 400°F for 8–10 minutes, flipping halfway, until the tortillas are golden and the cheese has formed crisp edges. You’ll hear a faint sizzle and see light blistering.
- Step 8: Finish and adjust — Add chopped coriander, a sprinkle of Parmesan if using, and a squeeze of lime. Taste one immediately and adjust salt or lime—this is where balance locks in.
Extra Prep Tips for Better Results Every Time
Cutting the chicken evenly is more important than it seems. Smaller, uniform pieces cook at the same rate, which means you get consistent browning without some pieces drying out while others lag behind.
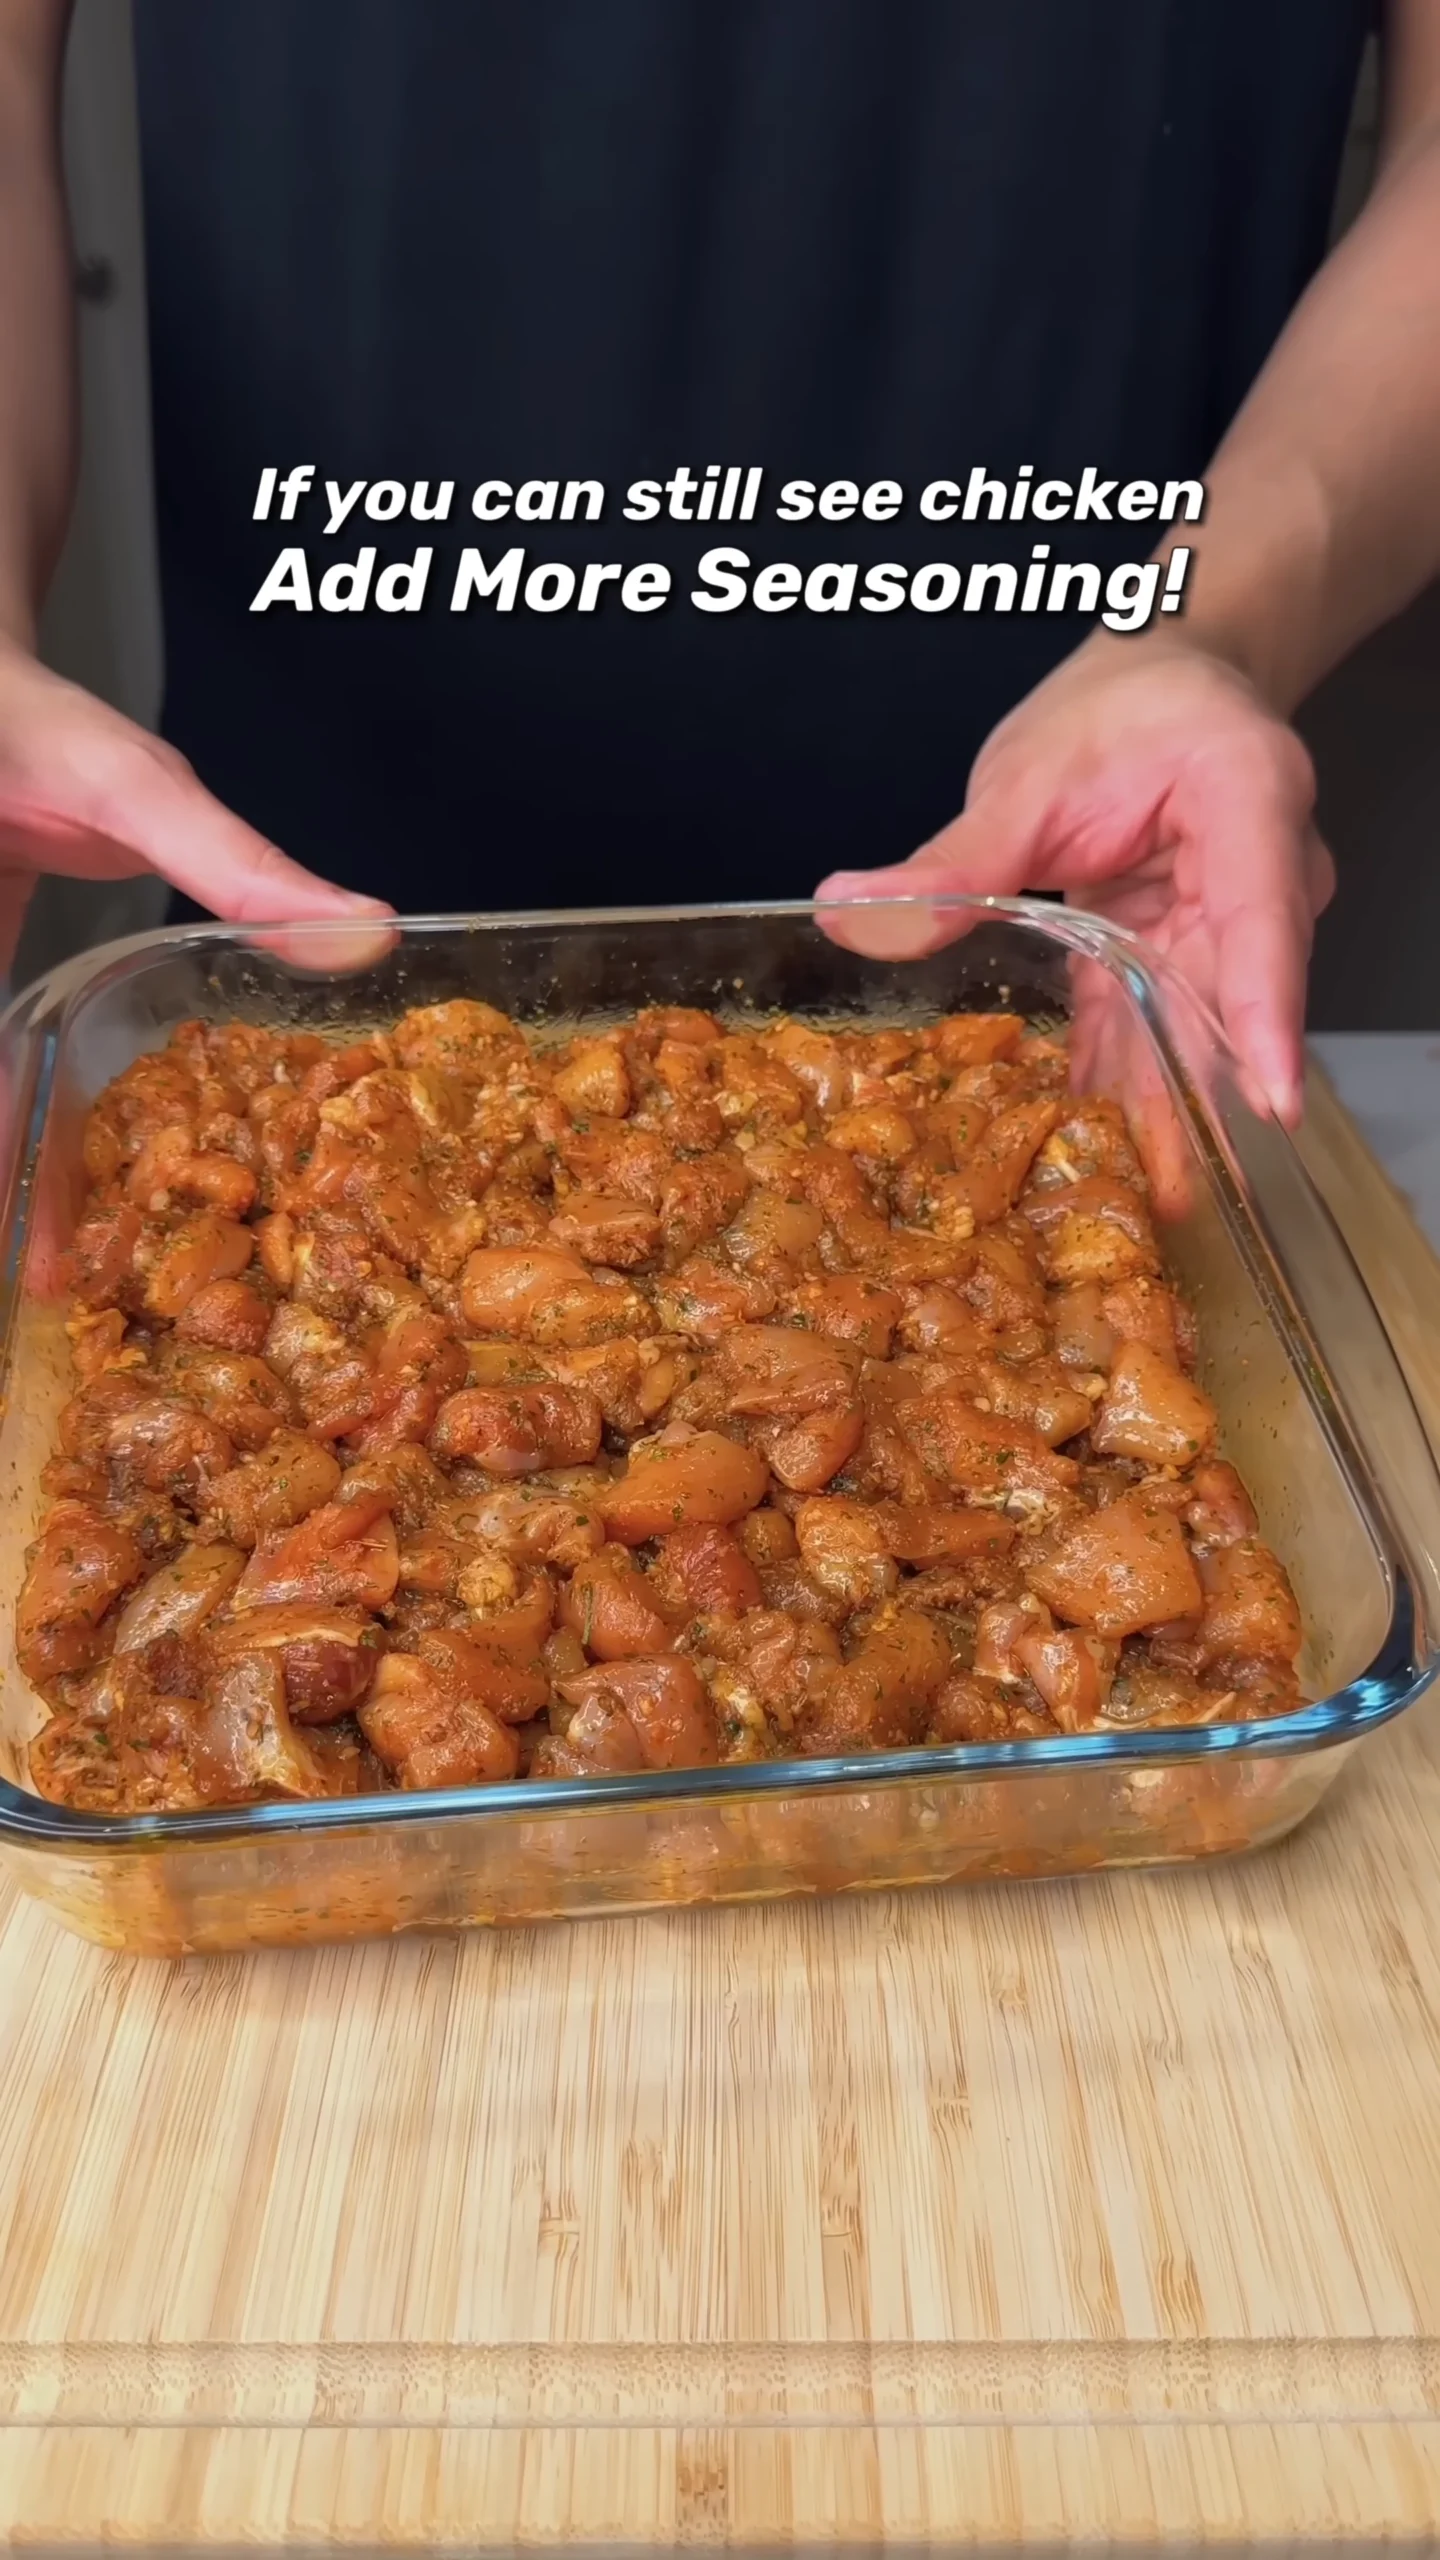
If you have time, let the seasoned chicken sit for 10–15 minutes before cooking. This short rest allows the salt to penetrate slightly and helps the spices adhere better during searing.
Bring tortillas to room temperature before assembling. Cold tortillas tend to stiffen and crack when folded, especially once heated.
Organize your tray before you start building. Working quickly keeps the chicken warm and prevents the fat from solidifying before it coats the tortillas.
Technique Tips for Maximum Crispiness
Use a metal tray instead of glass. Metal heats faster and transfers heat more aggressively to the tortillas, which helps them crisp instead of soften.
Preheating the tray for a few minutes before placing the tacos on it gives you an instant sizzle effect, similar to pan-frying the bottom.
Don’t skip flipping halfway through cooking. This ensures both sides get exposure to dry heat and prevents one side from softening under the filling.
If using an air fryer, avoid stacking. Cook in batches if needed so hot air can circulate freely.
Finally, resist overfilling. Too much chicken or salsa weighs down the tortilla and traps steam, undoing all your crisping work.
One more small upgrade: grate your cheese fresh and spread it evenly edge-to-edge. Those thin edges are what turn into crispy, golden lace. Clumps melt unevenly and reduce surface contact with the tortilla.
Making the Creamy Chipotle Taco Sauce
Mix 150g low-fat yogurt, 50g light mayo, and 50g chipotle paste until smooth. Stir in 1/2 tsp each garlic powder, onion powder, smoked paprika, and cumin. Add a splash of milk to loosen it to a drizzle.
You’re aiming for a sauce that coats the back of a spoon but still flows. Too thick and it sits heavy; too thin and it disappears. If you like a brighter edge, a spoon of a creamy cilantro lime dressing style blend folded in works well.
For extra depth, let the sauce rest in the fridge for at least 30 minutes before serving. The spices hydrate and the flavors become more rounded and cohesive.
If you prefer less heat, reduce the chipotle paste and add a squeeze of lime or a touch of honey to balance the flavor without losing complexity.
This sauce also doubles as a dip for any extra crispy edges or leftover chicken, so consider making a slightly larger batch if you like saucier tacos.
Flavor Variations You Can Try
Once you’ve nailed the base recipe, it’s easy to adjust the flavor without changing the technique.
For a smoky BBQ twist, swap chipotle sauce for a light brush of barbecue sauce on the chicken before baking. Keep it minimal so the tacos still crisp.
For a fresher, lighter version, use lemon instead of lime and add a yogurt-herb drizzle with dill or parsley.
If you want something spicier, add finely chopped jalapeños or a pinch of cayenne directly to the chicken seasoning.
You can also turn this into a low-carb option by using high-protein wraps or lettuce cups, though you’ll lose some of the crisp texture that defines this recipe.
Another variation is to add a thin layer of sliced pickled onions after baking. They bring acidity and crunch without introducing moisture during cooking.
How to Serve It
Serve the tacos straight from the oven or air fryer while the shells are still audibly crisp. Drizzle the chipotle sauce lightly across the top rather than drowning them—keep that crunch intact.
Add extra lime wedges and a final pinch of Parmesan for contrast. A simple slaw or even a taco night spread inspired by grilled shrimp tacos with pineapple salsa pairs well when you want something fresh alongside.
If serving for a group, keep batches warm in a low oven (around 90°C / 195°F) on a rack rather than stacked on a tray. This prevents trapped steam and keeps the shells crisp longer.
They’re at their best in the first 5–10 minutes. After that, the tortillas soften slightly as steam settles in.
For a more complete meal, serve alongside rice, grilled vegetables, or a simple bean salad. The tacos are rich, so lighter sides help balance the plate.
Storage and Reheating
Fridge: Store chicken, tortillas, and sauce separately in airtight containers for up to 3 days. Keeping components apart preserves texture.
Freezer: Chicken freezes well for up to 2 months. Thaw overnight in the fridge. Assembled tacos don’t freeze well—the tortillas lose their crisp structure.
Reheating: Reheat chicken in a pan over medium heat or in the microwave until hot. Reassemble and crisp in the oven or air fryer at 190°C / 375°F for 4–6 minutes. A light spray of oil helps bring back that golden, crunchy edge.
If the tortillas seem dry when reheating, lightly brush with oil before placing them back in the oven. This helps restore flexibility while still allowing them to crisp.
Avoid microwaving assembled tacos if you care about texture—the steam will undo the crispness almost instantly.
Troubleshooting Common Issues
Tortillas turning soft: This usually means too much moisture. Reduce salsa, increase oven temperature slightly, or bake a minute longer.
Chicken not browning: The pan wasn’t hot enough or it was overcrowded. Cook in batches if needed to maintain high heat.
Cheese not crisping: Use less cheese or switch to a better melting type like mozzarella or Monterey Jack. Also make sure it’s in direct contact with the tortilla.
Flavor falling flat: Add a pinch more salt and finish with lime juice. Those two adjustments often fix everything instantly.
Tacos sticking to the tray: Use a lightly oiled or preheated metal tray, or line with parchment. Sticking usually means not enough initial heat or fat.
FAQ
Can I use chicken breast instead of thighs? Yes. Cut into small, even cubes and cook a bit faster—about 5–6 minutes. Breast dries out quicker, so pull it off the heat as soon as it’s just cooked through and lightly browned.
How do I make them spicier? Increase chipotle paste in the sauce or add chili flakes to the seasoning mix. A pinch of cayenne in the chicken works too, but go gradually—it builds fast once the tacos crisp in the oven.
Can I make these ahead of time? Prep the chicken and sauce in advance, but assemble and crisp right before serving. That final bake is what creates the texture contrast, and it doesn’t hold if done too early.
Why are my tacos not crispy? Most likely too much moisture or low heat. Don’t overload with salsa, and make sure the oven is fully preheated. Brushing tortillas lightly with pan fat and placing cheese first also makes a big difference.
Related Recipes
- Creamy Gochujang Pasta Sauce Recipe
- Lemon Garlic Pasta
- Creamy Pesto Tortellini
- Spinach Artichoke Pasta
High Protein Crispy Cheesy Chicken Tacos Recipe
- Prep Time: 10
- Cook Time: 30
- Total Time: 40
- Yield: 6 tacos (3 servings) 1x
- Category: Main Course
- Method: Baking, Stovetop
- Cuisine: Mexican
- Diet: Gluten Free
Description
These High Protein Crispy Cheesy Chicken Tacos deliver juicy, well-seasoned chicken with crispy, golden tortillas and melted cheese in every bite. The method focuses on heat control and layering to keep the tacos crunchy while locking in flavor. Finished with fresh salsa, creamy chipotle sauce, and a squeeze of lime, they are balanced and satisfying. If you enjoy bold, comforting meals, you might also like this Marinara Sauce Recipe for another flavor-packed staple.
Ingredients
- 600 g boneless skinless chicken thighs (cut into small cubes for quick cooking)
- 1.5 tsp salt (fine sea salt preferred)
- 1.5 tsp garlic powder (for even seasoning)
- 1.5 tsp onion powder (adds depth)
- 2 tsp smoked paprika (for smoky flavor)
- 1.5 tsp dried parsley (or fresh if available)
- 1.5 tsp dried oregano (Mediterranean variety recommended)
- 1 tsp ground cumin (warm, earthy spice)
- 2 tsp olive oil (extra virgin)
- Cooking spray or light butter (for searing)
- 6 mini street soft tortillas (corn or flour, small size)
- 90 g shredded mozzarella (about 15 g per taco, melts well)
- 1 cup fresh salsa (diced tomato, red onion, coriander, lime juice, black pepper)
- 150 g low-fat yogurt (plain, thick consistency)
- 50 g light mayonnaise (for creaminess)
- 50 g chipotle paste (adjust to spice preference)
- 1/2 tsp garlic powder (for sauce)
- 1/2 tsp onion powder (for sauce)
- 1/2 tsp smoked paprika (for sauce)
- 1/2 tsp cumin (for sauce)
- 1–2 tbsp milk (to thin sauce as needed)
- 2 tbsp chopped fresh coriander (for garnish)
- 2 tbsp grated Parmesan (optional, for extra crisp and flavor)
- 1 lime (cut into wedges for serving)
Instructions
- Preheat Oven: Preheat oven to 400°F (200°C) for 10 minutes until fully hot; a properly heated oven ensures immediate sizzling.
- Season Chicken: In a bowl, mix chicken with salt, garlic powder, onion powder, paprika, parsley, oregano, cumin, and olive oil; coat evenly until no dry spots remain.
- Heat Pan: Heat a skillet over medium-high heat (about 375°F surface temperature) for 2 minutes until hot; add cooking spray or butter.
- Sear Chicken: Cook chicken for 6–8 minutes, stirring occasionally, until edges are golden brown and slightly crisp and internal temperature reaches 165°F.
- Prepare Sauce: Mix yogurt, mayo, chipotle paste, spices, and milk; stir for 1 minute until smooth and pourable with a creamy consistency.
- Prep Tortillas: Lightly brush one side of each tortilla with chicken pan juices; they should look glossy but not soaked.
- Assemble Tacos: Place mozzarella directly on tortillas, then add chicken and top with fresh salsa; keep layers neat to avoid excess moisture.
- Bake Tacos: Arrange tacos spaced apart on a tray; bake at 400°F for 8–10 minutes, flipping at 5 minutes, until tortillas are crisp and edges blistered.
- Check Crispness: Remove when cheese is melted and slightly golden and tortillas feel firm and crunchy when tapped.
- Finish and Serve: Garnish with coriander, Parmesan, and a squeeze of lime; serve immediately with creamy sauce while hot and crisp.
Notes
- Substitution: Chicken breast can be used instead of thighs, but reduce cooking time slightly to prevent dryness.
- Make-ahead: Cook the chicken up to 2 days in advance and store refrigerated; assemble and bake fresh for best texture.
- Storage: Store leftover cooked tacos in an airtight container in the fridge for up to 2 days.
- Reheating: Reheat in oven or air fryer at 375°F for 5–7 minutes until crisp again; avoid microwaving as it softens tortillas.
- Serving suggestion: Pair with extra lime wedges, guacamole, or a light salad for balance.
- Spice level: Adjust chipotle paste to taste or swap for mild smoked paprika for less heat.
Nutrition
- Array